| This article might need to be rewritten.
Reason: Outdated builds/tactics |
|
The PvXwiki community finds this to be a great build. This build has received an overall rating in the range from 4.75 to 5.0 and thus qualifies for the highest category of working builds: Great. This build has been designed for the following use: |
This is a team build for farming Kurzick faction quickly. It begins from Unwaking Waters (Kurzick). Using these builds, a team can clear Morostav Trail in 15-23 minutes for 22-25k Kurzick faction.
A conset is not required but is highly recommended. Note that if each player contributes ~1k towards the cost of a set by dropping it at the start, and each player earns ~1400 gold (excluding drops) for a successful vanquish, the gold invested in the conset is completely regained at the end of the run.
Frequency[]
These builds used to be used by the #1 Kurzick faction alliance and by other top Kurzick alliances.
Overview[]
4x![]() /
/![]() WotA
WotA
1x![]() /
/![]() VoS
VoS
1x![]() /
/![]() MoN
MoN
1x![]() /
/![]() MoR
MoR
1x![]() /
/![]() MoP
MoP
WotA[]
12 + 1 + 1 12 + 1 You have an additional 13% chance to critical hit. Whenever you critical hit, you get 3 Energy.  Template code |


 Optional :
 "You Move Like a Dwarf!" - for interrupting things like Chilblains, Blurred Vision and heals.
 Death's Charge - to pop in and kill the Reapers and Spirits quickly.
Equipment[]
- Zealous daggers with +30 health and 15^50 damage modifier.
- Armor consisting of Radiants and Attunements. Headpiece is Radiant with +1 in Critical and +1 in Dagger Mastery.
Usage[]
- Keep Critical Eye and Way of the Assassin up at all times.
- Try to ball enemies to increase damage output from Death Blossom.
- Split to kill foes that are separate from main VoS groups.
- On shared paths focus on spiking enemy healers first.
- Use "I Am Unstoppable!" to prevent knockdown and cripple.
- Use Asuran Scan to prevent block/miss and remove death penalty.
VoS[]
The energy cost of Dervish enchantments is reduced by 40%. In PvE, gain +10 armor rating while enchanted. Template code |


Equipment[]
- Zealous scythe with +20% enchant and 15^50 damage modifier.
Usage[]
- Ball up enemies for highest damage.
- Keep Vow of Strength and Sand Shards up as much as possible. (Ebon Battle Standard of Honor's bonus damage stacks with these.)
- Use Staggering Force and Eremite's Attack to do massive AoE damage.
- Stay on the main path with the other scythes. Do not follow the WotAs when they split.
- Use "I Am Unstoppable!" to prevent knockdown and cripple.
- Use Asuran Scan to prevent block/miss and remove death penalty.
MoN[]
Your allies are healed for 51 Health whenever you cast Monk spells on them. Template code |


Usage[]
- At the beginning of the run, use Blood Ritual on both Bonders. During the run use the blood ritual some, especially during the necromancers, long runs, and the warden spirits and when pinged.
- Spam Order of Pain and resurrect dead players.
- For faster runs be sure to keep Great Dwarf Weapon up on the Wotas, which are usually the first two in the group.
MoR[]
Your allies are healed for 42 Health whenever you cast Monk spells on them. Template code |


Usage[]
- Use a Smiting headpiece (+1+3) when applying Strength of Honor to the frontline. Switch to (+1+3) a Divine headpiece afterwards.
- Apply and maintain Strength of Honor and Essence Bond on all 5 melee.
- Apply and maintain Blessed Aura on yourself.
- Chaining Glyph of Renewal and Seed of Life, cast Seed of Life on the Mo/R - who has life bond which will trigger healing when any of the frontline take damage. Cast the glyph earlier than needed to reduce downtime.
- Use Blessed Signet to keep up your energy.
MoP[]
Your allies are healed for 29 Health whenever you cast Monk spells on them. Template code |


Usage[]
- Use Balthazar's Spirit on yourself.
- Apply and maintain Life Bond on all 5 melee characters (before Life Bond) - use a protection headpiece.
- Apply and maintain Strength of Honor on all 5 melee
- Switch to a Divine Favor headpiece when not casting bonds to get more energy from Blessed Signet.
- Use Cautery Signet to remove conditions.
- Use "Go for the Eyes!" to help the melee's attacks be stronger.
- You can put Life bond on the MoR to help the Seed of Life work, when you go to use it to help save the Melee/Monks.
- Make sure to coordinate your Seed with that of the MoR's Seed.
Usage[]
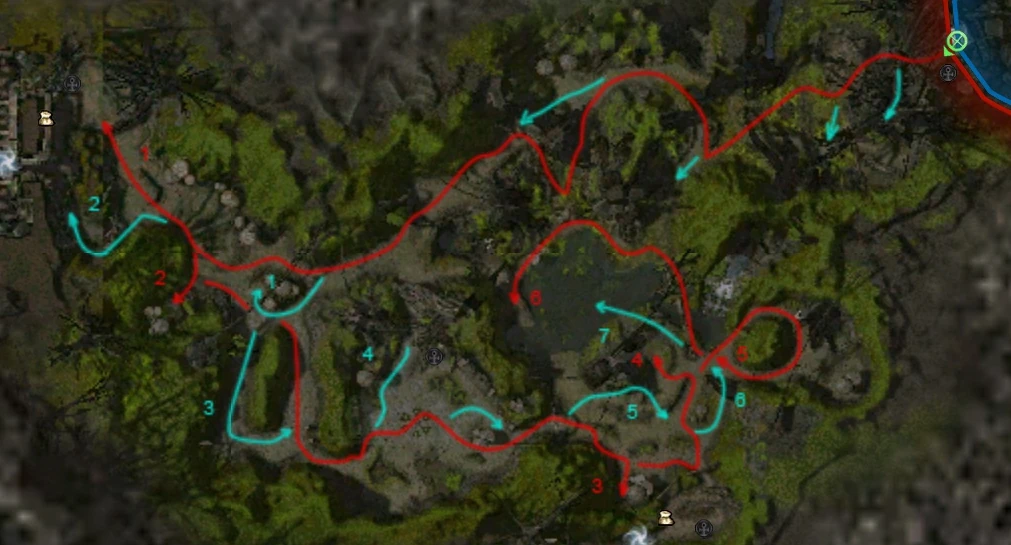

Main team in red with Assassin splits in blue.
- Everyone gets the blessing from the Kurzick Priest. Monks should /kneel at the shrine to get the Monk of Dwayna blessing from the Avatar of Dwayna.
- Wait for bonds to be put up (every frontliner gets Life Barrier, Life Bond and Strength of Honor)
- The first WoTA split occurs at the start - these two players head left and kill the Kirin + the group of Dragon Mosses. The main team kills the Afflicted and the
 Ritualist's Construct. The two groups meet up for the warrior boss Strongroot Tanglebranch.
 - Assassins split right. The main team kills all the stuff on the left, including the popup wardens.
- Assassins keep to the right and keep going. Main team bears left to kill the groups in compass range, and then merge with the assassins.
- Keep going straight along the path towards Vasburg Armory. The main team takes the afflicted group on the right while the assassins run to the left to kill the plants near the entrance to the Armory. The team regroups at the shrine and heads back to the Dredge ranger boss.
- The Afflicted Necromancers and Mesmers can remove enchantments - reapply as appropriate, and have melee target these first.
- (Deviation from map) The whole group kills the Dredge mob in the dead end. Kill the Gardener first, then melee, and then the boss Nandet.
- Heading southeast, assassins take next right, main team takes the turning after with the ranger boss Inallay Splintercall. Regroup at the Stone Guardians, killing Stone Reapers first since they have Chilblains.
- The whole group kills the Dredge, Plants and the necro boss Konrru, Tainted Stone's group. Afterwards, the two assassins bear left to kill the two Dragon Mosses and the Kirin and then rejoin the group which has ploughed towards the other side.
- Assassins head towards the necro boss, pulling back the smaller surrounding groups of wardens back from the boss. Main team bear right towards Durheim Archives, clear upto the shrine and then swing left towards Kyril Oathwarden.
- Regroup and clear upto the passageway towards Sunreach Warmaker. Ensure bonds are up again - this next bit has quite a bit of aggro. Targeting Wardens of the Spirit first, kill the warrior boss and the surrounding foes. Once complete, kill the assassin boss Falaharn Mistwarden.
- Head back to the lake, cross the bridge. Assassins head into the water. Using a long or flatbow, pull Arbor Earthcall away from his position (to avoid spawning six ritualist healers) and kill him. Meanwhile the main team should be clearing the edge of the lake - the split team should rejoin them to finish off the remaining foes. (Be wary of extra popups.)
- Complete! (hopefully!)
Notes[]
- Wotas and Melee are to make sure that all monks are in their Compass or they will loose bonds.
- Running from the monks to fight without bonds, when the monks are bonding causes monks to loose energy. Wait for your bonds, before you fight.
- Backline are to ping to the Blood Ritual person for energy, when running low (Monks ping above 20 energy as dropping too low causes bonds to drop. Elementalist pings at 80 energy (the build is given to the highly experienced bonders/monks that have Elementalists to use or have experience in Underworld Speed Clear as E/Mo).
Variants[]
| Position 1 Variant: Dagger Dervish | |
|---|---|
| |


| Position 1 Variant: Dagger Ranger | |
|---|---|
| |


| Position 1 Variant: Dagger Ritualist | |
|---|---|
| |


| Position 1 Variant: Dagger Warrior | |
|---|---|
| |


See also[]
- Team - DTSC Kurzick FFF - the meta Kurzick FFF prior to 600 nerf.
External links[]
- MTSC TexMod - TexMod path with the split labelled on the map