|
This build is provisionally vetted great pending more votes. This build has received a provisional rating in the range from 4.75 to 5.0 and thus qualifies for the highest category of working builds: Great. This build has been designed for the following use: |
This build is intended for quick and direct farming of bosses. It relies on the 55 concept to survive and punishment skills to quickly kill the boss in Hard mode. This build allows the user to charge directly for the boss monster and ignore the boss' mob.
Attributes and Skills[]
Gain 6 Energy whenever a non-Spirit creature near you dies, up to 3 times every 15 seconds.  Template code |


| Variant: N/any Low HP Farmer | |
|---|---|
Optionals: | |


Equipment[]
- Each of your armor pieces need to have a superior attribute Rune. This will lower your base Health to 105. (The only required type is blood, but 5 are necessary to hit 105 health. 1 Superior Soul Reaping may be useful for the 3 extra energy per kill.)
- It is a good idea to bring a second set of armor. This will allow you to adjust your health manually based on any Death Penalty you might accumulate.
- Any +5 energy/20% longer enchanting sword/axe such as Rajazan's Fervor or Totem Axe.
- The -50hp Grim Cesta from the Cities of Ascalon quest. (This is not required if you don't mind dying once and using a -20 offhand to hit 13hp. This will work better in most cases.)
- For the 13hp build, any -20hp offhand will work (preferably +12 energy). (Life is Pain Inscriptions help with this.)
- If you have any +hp offhands they could also be useful if any DP is accumulated.
Usage[]
- Cast Balthazar's Spirit when entering the explorable area.
- As you approach your target cast Protective Spirit and Blood Renewal.
- Cycle between Shield of Absorption and Shielding Hands for damage reduction.
- Target the boss monster and cast Spoil Victor and Pain Inverter.
- Get as much aggro as possible from the boss's mob of monsters.
- Use Life Siphon on multiple opponents to counter any excessive degen. If facing no degen skills, this won't be necessary.
- When you're fighting the boss (one on one), there is no need to keep using the small prots. Blood Renewal will keep your health up on its own.
Bosses[]
For an extended list, see: Guide:Boss Strategies for 55 SV Necromancers

Easy:
Tahkayun Tsi
Easy:
Chkkr Thousand Tail
Easy:
Byzzr Wingmender
Easy:
Ritualist's Construct
Medium:
Bubahl Icehands
Medium:
Jishol Darksong
Medium:
Reefclaw Ragebound, Soulwhisper and Mohby Windbeak
Hard:
Craw Stonereap and Zarnas Stonewrath


Tahkayun Tsi[]
(1 minute) N/Mo OANDQsNPTylqQzBtB1D3VrEyDA
Start from Ran Musu Gardens. Apply your enchants as usual before getting aggro, hex the boss until he dies.
Byzzr Wingmender[]
(1 minute) N/any OABDQsNHTvBBCnBtBDCqQxkhBA
Start from Lutgardis Conservatory and head north hugging the left wall. Cast Spoil Victor and Life Siphon on Byzzr from the other side of the wall. You don't need any protective skills as she can't hit you. Her Healing Breeze will slow things down a little but she'll quickly fall. Use Necrotic Traversal to jump to the corpse and quickly pick up the loot before the mantids spawn and attack you.
Variant Way: Go to Byzzr Wingmender as you would normally. Cast Awaken the Blood then Defile Flesh, Price of Failure, and Spoil Victor and cast your optional skills as necessary. Once Byzzr Wingmender is below half health, cast "Finish Him!". Use Necrotic Traversal to jump to the corpse and quickly pick up the loot before the mantids spawn and attack you.
Chkkr Thousand Tail[]
(2 minutes) N/A OAdDQsNHTvBTQnBtBDCqQxkhBA
Chkkr is very easy to kill but there's a warden patrol which might force you to rezone. Start from Saint Anjeka's Shrine and head south. You need to pass the Warden patrol by hugging the right edge, then wait briefly for the Mantid patrols to leave (one to the west, one to the south - there is the potential for a Mantid Mender to extend the fight). You will see Chkkr on the left - use the wall to obstruct its attacks. Kill Chkkr before the Mantid return. Avoid popping any Oni on the right (in the trees).
Arbor Earthcall[]
(2 minutes) N/Mo OANDYDxPT1D3VrEvBqQylxkyD
Arbor Earthcall is very easy to kill but if you get too close you will pop a bunch of wardens which can kill you pretty fast. Start from Durheim Archives and head North. Use a shout hero to run to the lake. Once you get to the lake, hug the right edge until Arbor Earthcall starts to run towards you. While staying near the wall, kill Arbor Earthcall. You will have a short time to pick up your loot before all of the Wardens spawn.
Ritualist's Construct[]
(1 minute) N/any OABDQsNHTvBBCnBqQDCgNxkhBA
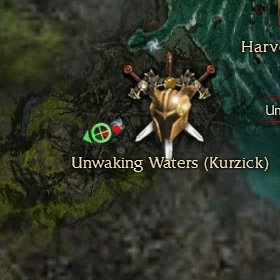
Use the variant build. You will also need a longbow. The Ritualist's Construct will not appear during or after the completion of Cleansing Morostav Trail unless Memories of Purity is active.
Start from the Unwaking Waters (Kurzick) outpost and enter Morostav Trail. Using your longbow, target the Ritualist's Construct and wait for a good oportunity to pull it back without aggroing any of the other enemies. Once it is hit, walk back to the wall on the right and pull it as close to the gate you entered from as you can without the construct being able to hit you. Cast Awaken the Blood then Defile Flesh, Price of Failure, and Spoil Victor and cast your optional skills as necessary. Once the Ritualist's Construct is below half health, cast "Finish Him!".
Bubahl Icehands[]
(1 minute) N/Mo OANDQsNPTylqQzBtB1D3VrEyDA
Bubahl is easy to kill, but you will be under a little pressure so be careful. Optionally bring a paragon hero for a speed boost, flag it by the shrine at the start. Start from Nundu Bay and head east, you will see him on the beach. Pull him or any of the Skale with a longbow to avoid pressure from the nearby Insects. Use your skills to kill Bubahl, but keep attacking with your spear or he'll run off. The longer you take, the more likely it is that the warrior Skale will interrupt key skills with Agonizing Chop. You may cast Life Siphon on a couple other foes to increase your regeneration.
Jishol Darksong[]
(2 minutes) N/Mo OANEQsJH+6wnVhzh2Q94uuSkHA
Firstly, replace Pain Inverter with Well of Silence. Set Protection Prayers to 10, and Curses to 8 instead.
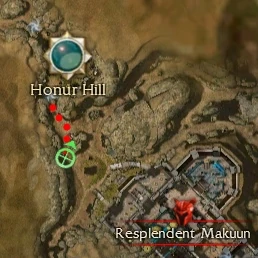
Jishol has a potent self heal in the form of Leader's Comfort and his team inflicts burning. He stands just outside Honur Hill in Resplendent Makuun. You will need to kill some of his team in order to lower the efficiency of his Leader's Comfort, as well as prevent the use of shouts and chants with Well of Silence.
Kill a Mokele first (auto attack with your spear to pull it closer if it flees), then create a first Well of Silence and eliminate the Shrieker. Now use Spoil Victor and Life Siphon on Jishol to quickly reduce him below 60% health - now use a second Well of Silence on the corpse of the Shrieker - keep Spoil Victor up and he will die very quickly. Be careful with the burning, try to have at least one copy of ![]() Life Siphon up all the time.
Life Siphon up all the time.
Reefclaw Ragebound, Soulwhisper & Mohby Windbeak[]
(5 minutes) N/Mo OANDQsNPTylqQzBtB1DDCxkyDA
Start from Leviathan Pits and move northwest through the fight between Luxons and Outcasts. Be careful to their necromancers which us disenchantment and life steal. In theory, you shouldn't have any problem but use Protective Spirit before moving through. Apply Balthazar's Spirit once through.
Follow the path and start with Reefclaw Ragebound as he may get killed by nearby Outcasts. You can aggro him alone without any bow, then have him follow you a little east closer to the wave. Beware of his Distracting Blow which can interrupt a couple of your key skills, so use Protective Spirit before aggroing, Spoil Victor, then Blood Renewal before he reaches you.
Once it is dead, move southwest on the little isle. Soulwhisper stands in a hole, making him easily aggroed without any Wallows with a flatbow (higher arc than longbow). Pull him back a little to the ramp and kill him out of range of the Rot Wallows. He may use Preservation which makes the fight longer, so manage your energy by prioritising Spoiler Victor, Protective Spirit and Blood Renewal.
Mohby is just north from here but there are many patrols around - notably Creeping Carp with Expunge Enchantments (instant death). Try to move carefully and pull him alone onto a low wave a little east from where he starts. Let him hit you so Pain Inverter damages him. He uses Power Drain and up to -5 degeneration, which can produce a little pressure. You need to take him down quickly in order not to run out of energy, and avoid aggroing nearby fish.
Craw Stonereap & Zarnas Stonewrath[]
(3 minutes) N/Mo OANDQsNPTxkqQzBtE1D3VrE5VA
Note that Craw Stonereap takes a bit of practise to avoid getting your enchantments removed and one-shot whilst applying Spoil Victor.
Change Balthazar's Spirit for Mending Touch, Life Siphon for Remove Hex, and Pain Inverter for "Finish Him!". Optionally bring a paragon hero with speed boosts to pass the Wardens more quickly.
Start from Altrumm Ruins and head west, hugging the left wall. Apply your protective enchantments (and speed boosts if you brought a paragon) and run through the Wardens - they don't have enchantment removal but can knock you down if you get close, just keep going along the corridor until they break aggro. Try and avoid the Barbed Traps. Return along the corridor to the exit, avoiding the Wardens you just passed by, and head for the boss corridor.
Craw Stonereapcan disenchant you with Chilblains, but he also attacks from a longbow range, which means he won't cast spells if you do things well. First use Spoil Victor and move out of his spell range, use Blood Renewal as he may have cast some degeneration skill. Place yourself behind a wall if possible. When SV has expired, reapply it using the same process. If you get disenchanted, refresh your enchantments, be careful with its degeneration skills which can give -8 (this is why you brought Remove Hex).
Zarnas Stonewrath is by comparison easy to kill, however use a wall again as it will frequently cast Gale to knock you down during key skills. Try to cast your spells right after you've been knocked down. His Stone Daggers makes him take heavy damage through Spoil Victor.
Counters[]
- Enchantment Removal
- Interruption
- Multiple/Fast-Recharging Hex Removal
Variants[]
- A primary monk can easily run this build, having the advantage of longer durations on the protection prayers but slightly less damage.
- / Pain Inverter build: OwQTQ4HDHSuUFaOoNoe4ualQeAA
- / Jishol Darksong build: OwQUQ4j+OIN8ZV4coNUPurrE5BA
Videos[]
| Byzzr Wingmender |
Bubahl Icehands |
| Chkkr Thousand Tail |
Craw Stonereap & Zarnas Stonewrath |
| Jishol Darksong |
Reefclaw Ragebound & Soulwhisper & Mohby Windbeak |
| Arbor Earthcall |
Variant Videos
| Byzzr Wingmender |
Ritualist's Construct |