This sinway build is designed to complete the Catacombs of Kathandrax dungeon with fast times under 10 mins (2-2-4) with a Pick up Group for a chance of an Emerald Blade, a sword that is valued for its looks. Pug groups typically form at Doomlore Shrine in American Districts. See the speedclear wiki for more info.
FactionsAssassin. Shadow Arts 15Shroud of DistressEnchantment SpellFor 60 seconds, if you are below 50% Health, you have 8 health regeneration and a 75% chance to block attacks.10145
FactionsAssassin. Shadow Arts 15Shadow FormElite Enchantment SpellFor 21 seconds, you cannot be the target of enemy Spells, and you gain 5 damage reduction for each Assassin enchantment on you. You cannot deal more than 25 damage with a single skill or attack.5130
EotNNo Profession. Deldrimor rank Dwarven StabilityEnchantment SpellFor 24..30 seconds, your Stances last 55..100% longer. If you activated this Skill while drunk, you cannot be knocked down. PvE only.5¼30
EotNNo Profession. Ebon Vanguard rank Ebon Battle Standard of HonorWard SpellYou plant an Ebon Battle Standard of Honor at your current location. For 14..20 seconds, non-Spirit allies in this area strike for +8..15 damage and an additional +7..10 vs. Charr. PvE only.10120
EotNNo Profession. Ebon Vanguard rank Ebon EscapeSpellShadow Step to target other ally. You and that other ally are healed for 70..110 health. PvE only.5¼10
FactionsAssassin. Shadow Arts 15Death's ChargeSpellShadow Step to target foe. If that foe has more Health than you, you are healed for 200.5¼30
Template code
Usage[]
Level 1 & 2[]
Start running to the next level using Dwarven StabilityEotNNo Profession. Deldrimor rank 10Dwarven StabilityEnchantment SpellFor 30 seconds, your Stances last 100% longer. If you activated this Skill while drunk, you cannot be knocked down. PvE only.5¼30 and DashFactionsAssassin. UnlinkedDashStanceFor 3 seconds, you run 50% faster.58. Keep Shadow FormFactionsAssassin. Shadow Arts 16Shadow FormElite Enchantment SpellFor 22 seconds, you cannot be the target of enemy Spells, and you gain 5 damage reduction for each Assassin enchantment on you. You cannot deal more than 26 damage with a single skill or attack.5130 up, and use Shroud of DistressFactionsAssassin. Shadow Arts 16Shroud of DistressEnchantment SpellFor 62 seconds, if you are below 50% Health, you have 8 health regeneration and a 75% chance to block attacks.10145 when you are in danger
Level 3[]
Run to the closed gate, using your jumps as efficiently as possible to speed up the run. Try to save Ebon EscapeEotNNo Profession. Ebon Vanguard rank 10Ebon EscapeSpellShadow Step to target other ally. You and that other ally are healed for 110 health. PvE only.5¼10 for when you get crippled
Keep both Shadow FormFactionsAssassin. Shadow Arts 16Shadow FormElite Enchantment SpellFor 22 seconds, you cannot be the target of enemy Spells, and you gain 5 damage reduction for each Assassin enchantment on you. You cannot deal more than 26 damage with a single skill or attack.5130 and Shroud of DistressFactionsAssassin. Shadow Arts 16Shroud of DistressEnchantment SpellFor 62 seconds, if you are below 50% Health, you have 8 health regeneration and a 75% chance to block attacks.10145 up
Kill the Flame Djinn, using Ebon Battle Standard of HonorEotNNo Profession. Ebon Vanguard rank 10Ebon Battle Standard of HonorWard SpellYou plant an Ebon Battle Standard of Honor at your current location. For 20 seconds, non-Spirit allies in this area strike for +15 damage and an additional +10 vs. Charr. PvE only.10120, BarbsCoreNecromancer. Curses 12BarbsHex SpellFor 30 seconds, target foe takes 12 more damage when hit by physical damage.1025 and auto-attacks and collect the key
Run to the final room, using your jumps as efficiently as possible to speed up the run
Keep up Ebon Battle Standard of HonorEotNNo Profession. Ebon Vanguard rank 10Ebon Battle Standard of HonorWard SpellYou plant an Ebon Battle Standard of Honor at your current location. For 20 seconds, non-Spirit allies in this area strike for +15 damage and an additional +10 vs. Charr. PvE only.10120, BarbsCoreNecromancer. Curses 12BarbsHex SpellFor 30 seconds, target foe takes 12 more damage when hit by physical damage.1025
If you get a Firebomb run away from the group and use Death's ChargeFactionsAssassin. Shadow Arts 16Death's ChargeSpellShadow Step to target foe. If that foe has more Health than you, you are healed for 209.5¼30 or drop it.
FactionsAssassin. Shadow Arts 16Shroud of DistressEnchantment SpellFor 62 seconds, if you are below 50% Health, you have 8 health regeneration and a 75% chance to block attacks.10145
FactionsAssassin. Shadow Arts 16Shadow FormElite Enchantment SpellFor 22 seconds, you cannot be the target of enemy Spells, and you gain 5 damage reduction for each Assassin enchantment on you. You cannot deal more than 26 damage with a single skill or attack.5130
EotNNo Profession. Deldrimor rank Great Dwarf WeaponWeapon SpellFor 20 seconds, target other ally's weapon strikes for +15..20 damage and has a 28..40% chance to cause knock down. PvE only.1015
FactionsAssassin. Dagger Mastery 10Golden Phoenix StrikeOff-Hand AttackIf you are not under the effects of an Enchantment, this skill misses. If it hits, Golden Phoenix Strike deals +23 damage and all adjacent foes take 23 damage.58
FactionsAssassin. Dagger Mastery 10Repeating StrikeOff-Hand AttackMust follow an off-hand attack. If it hits, this attack strikes for +23 damage. If it misses, it takes an additional 15 seconds to recharge.5
EotNNo Profession. Ebon Vanguard rank Ebon EscapeSpellShadow Step to target other ally. You and that other ally are healed for 70..110 health. PvE only.5¼10
FactionsAssassin. Shadow Arts 16Death's ChargeSpellShadow Step to target foe. If that foe has more Health than you, you are healed for 209.5¼30
Template code
Usage[]
General usage[]
When killing, keep Great Dwarf WeaponEotNNo Profession. Deldrimor rank 10Great Dwarf WeaponWeapon SpellFor 20 seconds, target other ally's weapon strikes for +20 damage and has a 40% chance to cause knock down. PvE only.1015 up on everyone
Kill stuff by using Golden Phoenix StrikeFactionsAssassin. Dagger Mastery 10Golden Phoenix StrikeOff-Hand AttackIf you are not under the effects of an Enchantment, this skill misses. If it hits, Golden Phoenix Strike deals +23 damage and all adjacent foes take 23 damage.58, followed by spamming Repeating StrikeFactionsAssassin. Dagger Mastery 10Repeating StrikeOff-Hand AttackMust follow an off-hand attack. If it hits, this attack strikes for +23 damage. If it misses, it takes an additional 15 seconds to recharge.5
Level 1[]
Run to the Wurm while keeping Shadow FormFactionsAssassin. Shadow Arts 16Shadow FormElite Enchantment SpellFor 22 seconds, you cannot be the target of enemy Spells, and you gain 5 damage reduction for each Assassin enchantment on you. You cannot deal more than 26 damage with a single skill or attack.5130 up, using your jumps as efficiently as possible to speed up the run
Cast Shroud of DistressFactionsAssassin. Shadow Arts 16Shroud of DistressEnchantment SpellFor 62 seconds, if you are below 50% Health, you have 8 health regeneration and a 75% chance to block attacks.10145 when you are dying, although you should be able to survive by relying on Ebon EscapeEotNNo Profession. Ebon Vanguard rank 10Ebon EscapeSpellShadow Step to target other ally. You and that other ally are healed for 110 health. PvE only.5¼10
Use Death's ChargeFactionsAssassin. Shadow Arts 16Death's ChargeSpellShadow Step to target foe. If that foe has more Health than you, you are healed for 209.5¼30 on the Wurm or Ebon EscapeEotNNo Profession. Ebon Vanguard rank 10Ebon EscapeSpellShadow Step to target other ally. You and that other ally are healed for 110 health. PvE only.5¼10 on one of the other assassins and kill the Wurm. Collect the key
Wait for the Tank to zone to level 2.
Level 2[]
Run to the Regent of Flame while keeping Shadow FormFactionsAssassin. Shadow Arts 16Shadow FormElite Enchantment SpellFor 22 seconds, you cannot be the target of enemy Spells, and you gain 5 damage reduction for each Assassin enchantment on you. You cannot deal more than 26 damage with a single skill or attack.5130 up, using your jumps as efficiently as possible to speed up the run, and kill it
Cast Shroud of DistressFactionsAssassin. Shadow Arts 16Shroud of DistressEnchantment SpellFor 62 seconds, if you are below 50% Health, you have 8 health regeneration and a 75% chance to block attacks.10145 when you are dying, although you should be able to survive by relying on Ebon EscapeEotNNo Profession. Ebon Vanguard rank 10Ebon EscapeSpellShadow Step to target other ally. You and that other ally are healed for 110 health. PvE only.5¼10
Collect the key.
Wait for the tank to zone to level 3.
Level 3[]
Run to the closed gate, using your jumps as efficiently as possible to speed up the run
Keep both Shadow FormFactionsAssassin. Shadow Arts 16Shadow FormElite Enchantment SpellFor 22 seconds, you cannot be the target of enemy Spells, and you gain 5 damage reduction for each Assassin enchantment on you. You cannot deal more than 26 damage with a single skill or attack.5130 and Shroud of DistressFactionsAssassin. Shadow Arts 16Shroud of DistressEnchantment SpellFor 62 seconds, if you are below 50% Health, you have 8 health regeneration and a 75% chance to block attacks.10145 up
Run to the final room, using your jumps as efficiently as possible to speed up the run
When you reach the final room, start casting Great Dwarf WeaponEotNNo Profession. Deldrimor rank 10Great Dwarf WeaponWeapon SpellFor 20 seconds, target other ally's weapon strikes for +20 damage and has a 40% chance to cause knock down. PvE only.1015 on everyone
If you get a Firebomb run away from the group and use Death's ChargeFactionsAssassin. Shadow Arts 16Death's ChargeSpellShadow Step to target foe. If that foe has more Health than you, you are healed for 209.5¼30 or drop it.
FactionsAssassin. Shadow Arts 16Shroud of DistressEnchantment SpellFor 62 seconds, if you are below 50% Health, you have 8 health regeneration and a 75% chance to block attacks.10145
FactionsAssassin. Shadow Arts 16Shadow FormElite Enchantment SpellFor 22 seconds, you cannot be the target of enemy Spells, and you gain 5 damage reduction for each Assassin enchantment on you. You cannot deal more than 26 damage with a single skill or attack.5130
EotNNo Profession. Norn rank "You Move Like a Dwarf!"ShoutTarget foe is knocked down and takes 44..80 damage. When that foe gets up, it is Crippled for 8..15 seconds. PvE only.1010
FactionsAssassin. Dagger Mastery 10Golden Phoenix StrikeOff-Hand AttackIf you are not under the effects of an Enchantment, this skill misses. If it hits, Golden Phoenix Strike deals +23 damage and all adjacent foes take 23 damage.58
FactionsAssassin. Dagger Mastery 10Repeating StrikeOff-Hand AttackMust follow an off-hand attack. If it hits, this attack strikes for +23 damage. If it misses, it takes an additional 15 seconds to recharge.5
EotNNo Profession. Ebon Vanguard rank Ebon EscapeSpellShadow Step to target other ally. You and that other ally are healed for 70..110 health. PvE only.5¼10
FactionsAssassin. Shadow Arts 16Death's ChargeSpellShadow Step to target foe. If that foe has more Health than you, you are healed for 209.5¼30
Template code
Usage[]
Same usage as the GDW Daggers build above, except use "You Move Like a Dwarf!"EotNNo Profession. Norn rank 10"You Move Like a Dwarf!"ShoutTarget foe is knocked down and takes 80 damage. When that foe gets up, it is Crippled for 15 seconds. PvE only.1010 to help keep your target knocked down.
Equipment[]
All builds use the same equipment. Note that the A/N Gater should also be using Alcohol to avoid knockdowns.
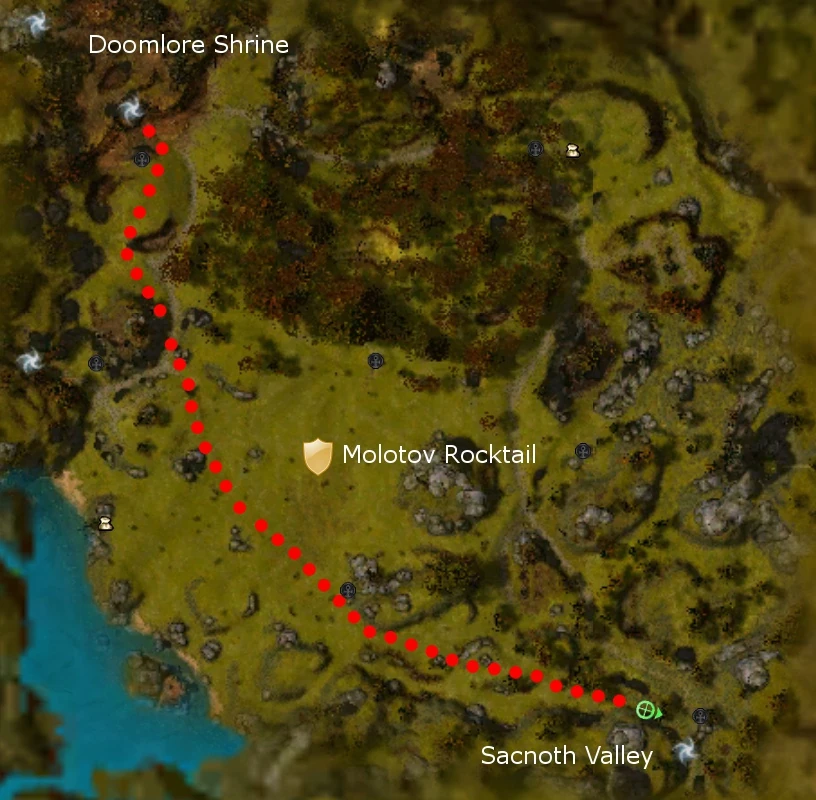
The A/N should make the run, as he has Dash on his bar. Running through Dalada Uplands to Sacnoth is very straightforward. The only dangerous enemy you will meet if you are careless is Molotov Rocktail, but that is easily avoidable if you watch your compass. Even if you do aggro him just keep running and you won't take much damage.
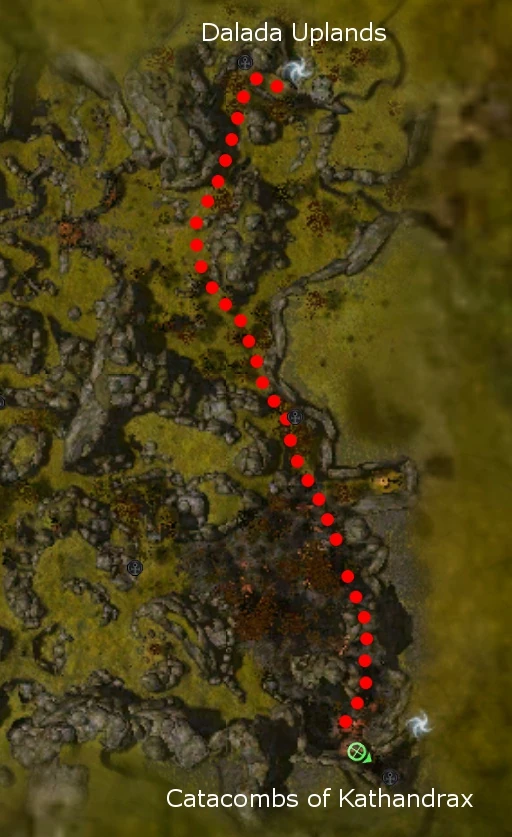
The run from Sacnoth Valley to Kath will look a bit more difficult. However, as long as you recast SF on recharge, it will be very simple and you will not die. Make sure to not aggro any bosses along the way if you can. If needed. use Death's Charge for mobility/heal and to lose aggro.
Counters[]
Not Maintaining your enchantments while running.
Daze from Enchanted Swords on Level 1 and 2 when you have to recast SF.
Bad A/N
Not dropping Fire bombs away from the party.
Getting hit by a Lava boulder. (stand between the paths taken by the outer and inner boulders, which is just about where Ilsunder Spawns)


