| NOTE: This template should be replaced with {{Real-Vetting}} |
|
The PvXwiki community finds this to be an excellent build. Through the PvX vetting system, it has reached an overall rating in the range from 4.75 to 5.0 and thus qualifies for the highest category of working builds: Great. This build has been designed for the following use: |
Build meant to farm Plant Fibers and Sunspear Title Track in Hard Mode in the Holdings Of Chokhin.
Tank


Equipment
- Blessed Armor with the appropriate runes. Fill it with what you feel necessary.
- Spear of Enchanting and +5 energy.
- Shield with +45/Enchanted and -2/Enchanted.
Bonder
Your allies are healed for 10 Health whenever you cast Monk spells on them.  Template code |


Optionals
- Seed of Life. If the tank would die at balling up the mob.
- Selfless Spirit. Energy reduction while bonding up.
- Great Dwarf Weapon. Use on VoS for extra damage.
- Rebirth if your tank makes a mistake.
Heroes
- Edge of Extinction if you think hero casting MoP is a bad idea.
- Purge Signet to remove unwanted conditions when the fight is over.
- Rebirth if your tank makes a mistake.
Equipment
- There is no real armor you need. Just the appropriate runes.
- Any weapon set works fine. +20 Energy Staff are the best.
VoS Spiker


Templates
 OQojENp8KTfbmXaX0l0kNXAAAAA
 OgojcNp8KTfbmXaX0l0kNXAAAAA
- OwoikyrM9tZepdRXST2cBAAAA
- OgpjwMp8KTfbmXaX0l0kNXAAAAA
- OQpikyrM9tZepdRXST2cBAAAA
- OApjYMp8KTfbmXaX0l0kNXAAAAA
- OAqikyrM9tZepdRXST2cBAAAA
- OwpjMOp8KTfbmXaX0l0kNXAAAAA
- OQqikyrM9tZepdRXST2cBAAAA
Optionals
- Death's Charge. Instead of Ebon Escape when going Assassin as primary or secondary profession
- Dash. Speedboost
- Viper's Defense. Shadowstep after spiking
- Air of Superiority
- Aura of Holy Might. Extra damage
- "I am the Strongest
Equipment
- Blessed Armor with high energy if needed. Otherwise Superior Vigor and Vitae.
- Zealous/Sundering Scythe of Enchanting with +15/Enchanted Mod is ideal. +5 Energy if you need it.
Usage
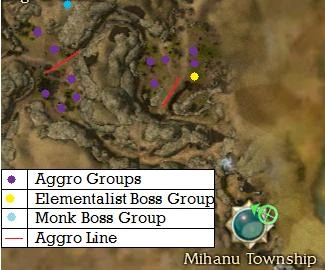
This is the map and the information
Using Monk Hero
Part 1
- Let the dervish take the hero. (Disable all skills but blessed signet)
- Upon zoning, take your bounty if wanted, and get your bonds on the tank.
- Move to the elementalist boss group. This is the fastest way.
- There are two ways to do this. Only the experienced should work towards the second way.
Way 1
- Tank, maintain your enchantments and above all Shadow Form. VoS, maintain your skills 1-3 in that order when the time is nigh to spike. Maintain optionals as necessary.
- Death's Charge to the nearest aggro to the LEFT of you. Move to the northeast to grab the other groups and start to move back, wall-hugging.
- There is a boulder, move around the boulder, getting the casters at the boulder.
- Death's Charge up, ping a center target.
- By now, EoE should be placed in range, with the hero flagged. Death's Charge or use Ebon Escape and target the monster. Make a nice spike using skill 6. Use optionals as necessary.
- Tank, move to the right, aggroing all groups including the boss.
- There is a large stone, use the same method. Ping a center target.
- Spike again.
Way 2
- The difference:
- Tank, grab all groups and try to maintain control all the time. If not, you will regain all aggro at the "Aggro Line", which is given in the map. Move along this line to ball. Ping a center target.
- Use EoE and spike.
Part 2
- Run through the chasm, towards the second "Aggro Line". There are again two ways to kill:
Way 1
- Run to the right, grab all aggro including the aggro of the boss group. Wall-hug to the right. Ping a center target.
- Place EoE, flag, spike.
- Run to the other side, grab all aggro, wall-hug. Ping a center target.
- Place EoE, flag, spike.
Way 2
- Grab all aggro, and move along the aggro line. There won't be a disaggro if you do it right. Ping a center target.
- Spike.
Part 3
- Grab your rewards and resign.
Using Human Monk
- Upon zoning, take your bounty if wanted, and get your bonds on the tank.
- Move to the elementalist boss group. This is the fastest way.
- There are two ways to do this. Only the experienced should work towards the second way.
Way 1
- Tank, maintain your enchantments and above all Shadow Form. VoS, maintain your skills 1-3 in that order when the time is nigh to spike. Maintain optionals as necessary.
- Death's Charge to the nearest aggro to the LEFT of you. Move to the northeast to grab the other groups and start to move back, wall-hugging.
- There is a boulder, move around the boulder, getting the casters at the boulder.
- Death's Charge up, ping a center target.
- By now, the Dervish needs to ping the same target for the hero monk. Now use Mark of Pain. Death's Charge or use Ebon Escape and target the monster. Make a nice spike using skill 6 ONLY IF YOU SEE A HEX MARKER. Use optionals as necessary.
- Tank, move to the right, aggroing all groups including the boss.
- There is a large stone, use the same method. Ping a center target.
- Spike again.
Way 2
- The difference:
- Tank, grab all groups and try to maintain control all the time. If not, you will regain all aggro at the "Aggro Line", which is given in the map. Move along this line to ball. Ping a center target.
- Monk pings the same target as the tank does. Dervish only needs to look carefully for a hex marker and only must spike.
Part 2
- Run through the chasm, towards the second "Aggro Line". There are again two ways to kill:
Way 1
- Run to the right, grab all aggro including the aggro of the boss group. Wall-hug to the right. Ping a center target.
- Use MoP the same way as above and spike when you see a hex marker.
- Run to the other side, grab all aggro, wall-hug. Ping a center target.
- Use MoP the same way as above and spike when you see a hex marker.
Way 2
- Grab all aggro, and move along the aggro line. There won't be a disaggro if you do it right. Ping a center target.
- Use MoP the same way as above and spike when you see a hex marker.
Part 3
- Grab your rewards and resign.
Notes
- Estimated time per run: Non-Exp: 5-7 minutes, Exp: 4-5 minutes.
- Estimated drops: 25-50 fibers each.
- Estimated SS Points: 1000~
- Estimated SS Points per hour: 6000~
Counters
- The Monk and Dervish aggro.
- Tank dies due to large amounts of damage or degen.
- Spiking the wrong target.
Variants
- Essence Bond instead of Blessed Signet
- For Human Monks only: Bond the Dervish on spiking.