FactionsAssassin. Shadow Arts 16Shadow FormElite Enchantment SpellFor 22 seconds, you cannot be the target of enemy Spells, and you gain 5 damage reduction for each Assassin enchantment on you. You cannot deal more than 26 damage with a single skill or attack.5130
FactionsAssassin. Shadow Arts 16Shroud of DistressEnchantment SpellFor 62 seconds, if you are below 50% Health, you have 8 health regeneration and a 75% chance to block attacks.10145
FactionsAssassin. Shadow Arts 16Unseen FuryStanceAll adjacent foes are Blinded for 10 seconds. For 31 seconds, you cannot be blocked by Blinded foes. 520
EotNNo Profession. Asura rank Mental BlockEnchantment SpellFor 5..11 seconds you have a 50% chance to block attacks. This Enchantment is reapplied every time an enemy strikes you. PvE only.10115
FactionsAssassin. Shadow Arts 16Death's ChargeSpellShadow Step to target foe. If that foe has more Health than you, you are healed for 209.5¼30
Template code
Optionals[]
Armor of EarthCoreElementalist. Earth Magic Armor of EarthEnchantment SpellFor 30 seconds, you gain 24..53..62 armor, but move 50..21..12% slower.10¾15 instead of Unseen FuryFactionsAssassin. Shadow Arts Unseen FuryStanceAll adjacent foes are Blinded for 3..9..10 seconds. For 10..26..31 seconds, you cannot be blocked by Blinded foes. 520
"We Shall Return!"NightfallParagon. Command "We Shall Return!"ShoutAll party members in earshot are resurrected with 25..45..52% Health and 5..17..21% Energy.2530
Heart of ShadowFactionsAssassin. Shadow Arts Heart of ShadowSpellYou are healed for 30..126..158, and you Shadow Step to a nearby location directly away from your target.5¼15
Death's RetreatNightfallAssassin. Shadow Arts Death's RetreatSpellShadow Step to target ally. If you have less Health than that ally, you gain 40..112..136 Health.5¼20
Dark EscapeFactionsAssassin. Shadow Arts Dark EscapeStanceFor 5..13..16 seconds, you move 25% faster and take half damage. Dark Escape ends if you successfully hit with an attack.530
Cry of PainNightfallMesmer. Sunspear rank Cry of PainSpellInterrupt target foe's skill. If that foe was suffering from a Mesmer Hex, that foe and all foes in the area take 25..50 damage and -3..5 Health degeneration for 10 seconds. PvE only.10¼15
Grasping EarthPropheciesElementalist. Earth Magic Grasping EarthHex SpellFor 2..16..21 seconds, all nearby foes move 50% slower.10¾12 for a snare.
Ebon Battle Standard of HonorEotNNo Profession. Ebon Vanguard rank Ebon Battle Standard of HonorWard SpellYou plant an Ebon Battle Standard of Honor at your current location. For 14..20 seconds, non-Spirit allies in this area strike for +8..15 damage and an additional +7..10 vs. Charr. PvE only.10120 with Sliver ArmorFactionsElementalist. Earth Magic Sliver ArmorEnchantment SpellFor 5..10..11 seconds, you have 25..45..52% chance to block attacks and whenever you are the target of a hostile Spell or attack one nearby foe is struck for 5..29..37 earth damage.10130
Optional skills depend on whether you wish to be able to cover other Terra's, increase the Main Teams damage output or provide greater survivability.
Weapons: Caster shield and 20% enchanting weapon. High Energy staff with 20% enchanting, to swap to if low on energy.
Infiltrator, Saboteur and Vanguard armor sets advised all Terra's for armor buff when taking more offensively orientated builds.
Usage[]
Maintain Shadow FormFactionsAssassin. Shadow Arts 17Shadow FormElite Enchantment SpellFor 23 seconds, you cannot be the target of enemy Spells, and you gain 5 damage reduction for each Assassin enchantment on you. You cannot deal more than 28 damage with a single skill or attack.5130 and Shroud of DistressFactionsAssassin. Shadow Arts 17Shroud of DistressEnchantment SpellFor 64 seconds, if you are below 50% Health, you have 9 health regeneration and a 75% chance to block attacks.10145.. This only works when Essence of Celerity is up.
Use "I Am Unstoppable!"EotNNo Profession. Norn rank "I Am Unstoppable!"ShoutFor 16..20 seconds, you have +24 armor and cannot be knocked down or Crippled. PvE only.530 for Abyssals, and Shadow Warriors (If your health is below 50%).
Use Death's ChargeFactionsAssassin. Shadow Arts 17Death's ChargeSpellShadow Step to target foe. If that foe has more Health than you, you are healed for 218.5¼30 as a self-heal, balling method or a method for getting unstuck.
Use Unseen FuryFactionsAssassin. Shadow Arts 17Unseen FuryStanceAll adjacent foes are Blinded for 11 seconds. For 33 seconds, you cannot be blocked by Blinded foes. 520 when "I Am Unstoppable!"EotNNo Profession. Norn rank "I Am Unstoppable!"ShoutFor 16..20 seconds, you have +24 armor and cannot be knocked down or Crippled. PvE only.530 drops.
You activate Spells and Signets 46% faster. (No effect for non-Mesmer skills with a cast time less than 2 seconds.) In PvE, the recharge time of your Mesmer Spells is reduced by 39%.
EotNNo Profession. Asura rank Air of SuperioritySkillFor 20..30 seconds you gain a random Asura benefit every time you earn experience from killing an enemy. PvE only.520
CoreMesmer. Illusion Magic 16Arcane ConundrumHex SpellFor 16 seconds, Spells cast by target foe and all adjacent foes take twice as long to cast. When this hex ends, you gain 7 Energy.101.120
PropheciesMesmer. Illusion Magic 16IneptitudeElite Hex SpellFor 4 seconds, the next time target foe or any adjacent foes attacks, that foe takes 142 damage and becomes Blinded for 10 seconds.100.515
NightfallMesmer. Sunspear rank Cry of PainSpellInterrupt target foe's skill. If that foe was suffering from a Mesmer Hex, that foe and all foes in the area take 25..50 damage and -3..5 Health degeneration for 10 seconds. PvE only.100.115
NightfallMesmer. Illusion Magic 16Signet of ClumsinessSignetIf target foe is attacking, that foe and all adjacent foes are interrupted and take 63 damage. Any foes using attack skills are knocked down.0.28
EotNMesmer. Illusion Magic 16Wandering EyeHex SpellFor 4 seconds, the next time target foe attacks, that attack is interrupted and all nearby foes take 115 damage.51.112
EotNNo Profession. Norn rank "You Move Like a Dwarf!"ShoutTarget foe is knocked down and takes 44..80 damage. When that foe gets up, it is Crippled for 8..15 seconds. PvE only.1010
FactionsRitualist. Restoration Magic 3Flesh of My FleshSpellLose half your Health. Resurrect target party member with your current Health and 8% Energy.52.2
Call the hex Arcane ConundrumCoreMesmer. Illusion Magic Arcane ConundrumHex SpellFor 5..13..16 seconds, Spells cast by target foe and all adjacent foes take twice as long to cast. When this hex ends, you gain 1..6..7 Energy.10220 on a central target to signal the other spikers to start spiking.
Spike using IneptitudePropheciesMesmer. Illusion Magic IneptitudeElite Hex SpellFor 4 seconds, the next time target foe or any adjacent foes attacks, that foe takes 30..114..142 damage and becomes Blinded for 10 seconds.10115 → Cry of PainNightfallMesmer. Sunspear rank Cry of PainSpellInterrupt target foe's skill. If that foe was suffering from a Mesmer Hex, that foe and all foes in the area take 25..50 damage and -3..5 Health degeneration for 10 seconds. PvE only.10¼15 → Signet of ClumsinessNightfallMesmer. Illusion Magic Signet of ClumsinessSignetIf target foe is attacking, that foe and all adjacent foes are interrupted and take 15..51..63 damage. Any foes using attack skills are knocked down.¼8.
Use Wandering EyeEotNMesmer. Illusion Magic Wandering EyeHex SpellFor 4 seconds, the next time target foe attacks, that attack is interrupted and all nearby foes take 30..94..115 damage.5212 for clean up.
You activate Spells and Signets 46% faster. (No effect for non-Mesmer skills with a cast time less than 2 seconds.) In PvE, the recharge time of your Mesmer Spells is reduced by 39%.
EotNNo Profession. Asura rank Air of SuperioritySkillFor 20..30 seconds you gain a random Asura benefit every time you earn experience from killing an enemy. PvE only.520
CoreMesmer. UnlinkedArcane EchoEnchantment SpellIf you cast a Spell in the next 20 seconds, Arcane Echo is replaced with that Spell for 20 seconds. Arcane Echo ends prematurely if you use a non-Spell skill.151.120
CoreMesmer. Domination Magic 16Energy SurgeElite SpellTarget foe loses 11 Energy. For each point of Energy lost, that foe and all nearby foes take 9 damage.51.115
NightfallMesmer. Sunspear rank Cry of PainSpellInterrupt target foe's skill. If that foe was suffering from a Mesmer Hex, that foe and all foes in the area take 25..50 damage and -3..5 Health degeneration for 10 seconds. PvE only.100.115
FactionsMesmer. Domination Magic 16Unnatural SignetSignetTarget foe takes 79 damage. If that foe is under the effects of a hex or enchantment, foes adjacent to your target take 53 damage.0.610
NightfallMesmer. Domination Magic 16MistrustHex SpellFor 6 seconds, the next spell that target foe casts on one of your allies fails and deals 106 damage to that foe and all nearby foes.101.112
CoreElementalist. Water Magic 3Deep FreezeHex SpellYou cause a Deep Freeze at target foe's location. All foes in this area are struck for 25 cold damage, and for 10 seconds, they move 66% slower.251.115
EotNNo Profession. Norn rank "You Move Like a Dwarf!"ShoutTarget foe is knocked down and takes 44..80 damage. When that foe gets up, it is Crippled for 8..15 seconds. PvE only.1010
Spike using Energy SurgeCoreMesmer. Domination Magic Energy SurgeElite SpellTarget foe loses 1..8..11 Energy. For each point of Energy lost, that foe and all nearby foes take 9 damage.5215 → Cry of PainNightfallMesmer. Sunspear rank Cry of PainSpellInterrupt target foe's skill. If that foe was suffering from a Mesmer Hex, that foe and all foes in the area take 25..50 damage and -3..5 Health degeneration for 10 seconds. PvE only.10¼15 → Unnatural SignetFactionsMesmer. Domination Magic Unnatural SignetSignetTarget foe takes 15..63..79 damage. If that foe is under the effects of a hex or enchantment, foes adjacent to your target take 5..41..53 damage.110.
Use MistrustNightfallMesmer. Domination Magic MistrustHex SpellFor 6 seconds, the next spell that target foe casts on one of your allies fails and deals 10..82..106 damage to that foe and all nearby foes.10212 on caster groups and Deep FreezeCoreElementalist. Water Magic Deep FreezeHex SpellYou cause a Deep Freeze at target foe's location. All foes in this area are struck for 10..70..90 cold damage, and for 10 seconds, they move 66% slower.25215 on large melee groups.
You activate Spells and Signets 53% faster. (No effect for non-Mesmer skills with a cast time less than 2 seconds.) In PvE, the recharge time of your Mesmer Spells is reduced by 48%.
NightfallMesmer. Fast Casting 16Symbolic CelerityEnchantment SpellFor 62 seconds, all of your signets use your Fast Casting attribute instead of their normal attributes.150.530
PropheciesMesmer. Fast Casting 16Keystone SignetElite SignetAll of your signets except Keystone Signet are recharged. For 20 seconds, the next 6 times you use a signet that targets a foe, all other foes adjacent to your target are interrupted and take 63 damage.0.515
FactionsMesmer. Domination Magic 10Unnatural SignetSignetTarget foe takes 55 damage. If that foe is under the effects of a hex or enchantment, foes adjacent to your target take 35 damage.0.510
NightfallMesmer. Illusion Magic 10Signet of ClumsinessSignetIf target foe is attacking, that foe and all adjacent foes are interrupted and take 45 damage. Any foes using attack skills are knocked down.0.18
FactionsNecromancer. Kurzick rank Signet of Corruption (Kurzick)SignetTarget foe and all nearby foes take 20..30 damage. For each affected foe suffering from a Condition or Hex, you gain 2 Energy (maximum 12..20 Energy). PvE only.120
NightfallNecromancer. Soul Reaping 0Signet of SorrowSignetTarget foe takes 15 damage. If target foe is near a corpse or has a dead pet, this Skill recharges instantly.130
EotNNo Profession. Norn rank "Finish Him!"ShoutIf target foe has less than 50% Health, that foe takes 44..80 damage and suffers from Cracked Armor and a Deep Wound for 12..20 seconds. PvE only.1015
Precast Symbolic CelerityNightfallMesmer. Fast Casting Symbolic CelerityEnchantment SpellFor 36..55..62 seconds, all of your signets use your Fast Casting attribute instead of their normal attributes.15130 and Keystone SignetPropheciesMesmer. Fast Casting Keystone SignetElite SignetAll of your signets except Keystone Signet are recharged. For 20 seconds, the next 0..5..6 times you use a signet that targets a foe, all other foes adjacent to your target are interrupted and take 15..51..63 damage.115 before spikes.
Press T when the caller pings a target and spike.
Spike using -> Unnatural SignetFactionsMesmer. Domination Magic Unnatural SignetSignetTarget foe takes 15..63..79 damage. If that foe is under the effects of a hex or enchantment, foes adjacent to your target take 5..41..53 damage.110 → Signet of ClumsinessNightfallMesmer. Illusion Magic Signet of ClumsinessSignetIf target foe is attacking, that foe and all adjacent foes are interrupted and take 15..51..63 damage. Any foes using attack skills are knocked down.¼8 → Signet of CorruptionFactionsNecromancer. Kurzick rank Signet of Corruption (Kurzick)SignetTarget foe and all nearby foes take 20..30 damage. For each affected foe suffering from a Condition or Hex, you gain 2 Energy (maximum 12..20 Energy). PvE only.120 → Signet of SorrowNightfallNecromancer. Soul Reaping Signet of SorrowSignetTarget foe takes 15..63..79 damage. If target foe is near a corpse or has a dead pet, this Skill recharges instantly.130.
Watch your energy when under the effects of Primal EchoesCoreRanger. Beast Mastery Primal EchoesNature RitualCreate a level 1..8..11 Spirit. For non-Spirit creatures within its range, Signets cost 10 Energy to use. This Spirit dies after 30..126..158 seconds.5560 in the Wailing Forest.
FactionsRitualist. Channeling Magic 16Signet of SpiritsElite SignetCreate three level 13 spirits. These spirits deal 21 damage with attacks. These spirits die after 60 seconds.130
FactionsRitualist. Channeling Magic 16BloodsongBinding RitualCreate a level 13 Spirit with 260 (+94) Health and 79 armor who dies after 158 seconds. Attacks by that Spirit steal up to 26 Health.5¾30
FactionsRitualist. Channeling Magic 16DestructionBinding RitualCreate a level 15 Spirit with 300 (+108) Health and 91 armor that dies after 30 seconds. When this Spirit dies, all foes in the area take 26 damage for each second the Spirit was alive (maximum 150 damage).10¾20
FactionsRitualist. Channeling Magic 16Painful BondHex SpellFor 21 seconds, target foe and all nearby foes are Hexed with Painful Bond and take 21 damage whenever hit by a Spirit's attack.15112
PropheciesRanger. Beast Mastery 10Edge of ExtinctionNature RitualCreate a level 7 Spirit with 140 (+50) Health and 44 armor. If a non-Spirit creature within range dies, Edge of Extinction deals 38 damage to all creatures of the same type that are below 90% Health and within range of the Spirit. This Spirit dies after 110 seconds.5560
FactionsRitualist. Kurzick rank Summon Spirits (Kurzick)SpellAll Spirits you control shadow step to your location, and gain 60..100 Health. PvE only.5¼5
FactionsRitualist. Spawning Power 9Rupture SoulSpellTarget allied Spirit is destroyed. All nearby enemies are struck for 104 lightning damage and become blinded for 8 seconds.10¾5
FactionsRitualist. Restoration Magic 2Flesh of My FleshSpellLose half your Health. Resurrect target party member with your current Health and 7% Energy.54
Template code
Variants[]
DestructionFactionsRitualist. Channeling Magic DestructionBinding RitualCreate a level 1..11..15 Spirit that dies after 30 seconds. When this Spirit dies, all foes in the area take 5..21..26 damage for each second the Spirit was alive (maximum 150 damage).10¾20
Explosive GrowthFactionsRitualist. Spawning Power Explosive GrowthEnchantment SpellFor 15..51..63 seconds, whenever you create a creature, up to 5 foes near that creature are struck for 20..56..68 lightning damage.5245
Ancestors' RageFactionsRitualist. Channeling Magic Ancestors' RageSkillFor 1 second, nothing happens. When this skill ends, all foes adjacent to target ally are struck for 5..89..117 lightning damage.5¼10
Spirit RiftFactionsRitualist. Channeling Magic Spirit RiftSpellOpen a Spirit Rift at target foe's location. After 3 seconds, all adjacent foes are struck for 25..105..132 lightning damage and suffer from Cracked Armor for 1..13..17 seconds. 1025
Summon Ice ImpEotNNo Profession. Asura rank Summon Ice ImpSpellSummon a level 14..20 Ice Imp that lives for 40..60 seconds and has Ice Spikes. Only 1 Asura Summon can be active a time. PvE only.10360
Summon MursaatEotNNo Profession. Asura rank Summon MursaatSpellSummon a level 14..20 Mursaat that lives for 40..60 seconds and has Enervating Charge. Only 1 Asura Summon can be active at a time. PvE only.10360
Summon Naga ShamanEotNNo Profession. Asura rank Summon Naga ShamanSpellSummon a level 14..20 Naga Shaman that lives for 40..60 seconds and has Stoning. Only 1 Asura Summon can be active a time. PvE only.10360
Summon Ruby DjinnEotNNo Profession. Asura rank Summon Ruby DjinnSpellSummon a level 14..20 Ruby Djinn that lives for 40..60 seconds and has Immolate. Only 1 Asura Summon can be active at a time. PvE only.10360
Use Rupture SoulFactionsRitualist. Spawning Power Rupture SoulSpellTarget allied Spirit is destroyed. All nearby enemies are struck for 50..122..146 lightning damage and become blinded for 3..10..13 seconds.10¾5 to solo The Tower of Courage blinding the Abbysals whilst your other spirits attack, rupture another spirit after 9 seconds has past, continue to recast spirits until the quest is complete.(Do not wand to avoid activating Spiteful SpiritPropheciesNecromancer. Curses Spiteful SpiritElite Hex SpellFor 8..18..21 seconds, whenever target foe attacks or uses a skill, Spiteful Spirit deals 5..29..37 shadow damage to that foe and all adjacent allies of that foe.15210 and do not panic BloodsongFactionsRitualist. Channeling Magic BloodsongBinding RitualCreate a level 1..10..13 Spirit who dies after 30..126..158 seconds. Attacks by that Spirit steal up to 5..21..26 Health.5¾30 and VampirismNightfallRitualist. Sunspear rank VampirismBinding RitualCreate a level 4..14 Spirit that dies after 30..150 seconds. Attacks by this Spirit steal up to 10..20 Health, and you are healed for 10..20 Health. PvE only.10¾30 will negate any damage as long as you keep the Abbysals blinded)
Head to the forge after you have finished The Tower of Courage.
During Defend the Temple after the main team has spiked the first group to the south aggro the second spawn and kill them using your spirits.
Take quests at the Forge.
Use Edge of ExtinctionPropheciesRanger. Beast Mastery Edge of ExtinctionNature RitualCreate a level 1..8..11 Spirit. If a non-Spirit creature within range dies, Edge of Extinction deals 14..43..52 damage to all creatures of the same type that are below 90% Health and within range of the Spirit. This Spirit dies after 30..126..158 seconds.5560 for all spikes, keep it in range using summon spirits.
FactionsAssassin. Shadow Arts 16Shadow FormElite Enchantment SpellFor 22 seconds, you cannot be the target of enemy Spells, and you gain 5 damage reduction for each Assassin enchantment on you. You cannot deal more than 26 damage with a single skill or attack.5130
FactionsAssassin. Shadow Arts 16Shroud of DistressEnchantment SpellFor 62 seconds, if you are below 50% Health, you have 8 health regeneration and a 75% chance to block attacks.10145
EotNNo Profession. Asura rank Mental BlockEnchantment SpellFor 5..11 seconds you have a 50% chance to block attacks. This Enchantment is reapplied every time an enemy strikes you. PvE only.10115
EotNNo Profession. Ebon Vanguard rank Ebon Battle Standard of HonorWard SpellYou plant an Ebon Battle Standard of Honor at your current location. For 14..20 seconds, non-Spirit allies in this area strike for +8..15 damage and an additional +7..10 vs. Charr. PvE only.10120
FactionsElementalist. Earth Magic 13Sliver ArmorEnchantment SpellFor 10 seconds, you have 47% chance to block attacks and whenever you are the target of a hostile Spell or attack one nearby foe is struck for 31 earth damage.10130
FactionsAssassin. Shadow Arts 17Death's ChargeSpellShadow Step to target foe. If that foe has more Health than you, you are healed for 218.5¼30
Template code
Optional:
"I Am Unstoppable!"EotNNo Profession. Norn rank "I Am Unstoppable!"ShoutFor 16..20 seconds, you have +24 armor and cannot be knocked down or Crippled. PvE only.530 or Dwarven StabilityEotNNo Profession. Deldrimor rank Dwarven StabilityEnchantment SpellFor 24..30 seconds, your Stances last 55..100% longer. If you activated this Skill while drunk, you cannot be knocked down. PvE only.5¼30
Variant:
If you are experienced then Mental BlockEotNNo Profession. Asura rank Mental BlockEnchantment SpellFor 5..11 seconds you have a 50% chance to block attacks. This Enchantment is reapplied every time an enemy strikes you. PvE only.10115 can be swapped for "Finish Him!"EotNNo Profession. Norn rank "Finish Him!"ShoutIf target foe has less than 50% Health, that foe takes 44..80 damage and suffers from Cracked Armor and a Deep Wound for 12..20 seconds. PvE only.1015 to speed up killing Menzies, or Radiation FieldEotNNo Profession. Asura rank Radiation FieldWard SpellFor 5 seconds, foes in the area have -4..6 Health degeneration. When the portal ends, foes in the area are Diseased for 12..20 seconds. PvE only.15212 to speed up the Tower of Strength.
Zealous Scythe of Enchanting(If your run out Energy for any reason)
Zealous Spear of Enchanting(for pulling in scattered enemies faster) with 2 different sets of shield, both should have +30HP mod or +45HP while enchanted mod(recommended), and either Armor + 10(vs Piercing) and Armor + 10(vs Fire), use the shield with fire protection mod in burning forest and Piercing Protection outside forest.
Infiltrator, Saboteur and Vanguard armor sets advised all Terra's for armor buff when taking more offensively orientated builds.
Usage[]
Maintain Shadow FormFactionsAssassin. Shadow Arts 17Shadow FormElite Enchantment SpellFor 23 seconds, you cannot be the target of enemy Spells, and you gain 5 damage reduction for each Assassin enchantment on you. You cannot deal more than 28 damage with a single skill or attack.5130 and Shroud of DistressFactionsAssassin. Shadow Arts 17Shroud of DistressEnchantment SpellFor 64 seconds, if you are below 50% Health, you have 9 health regeneration and a 75% chance to block attacks.10145. This only works when Essence of Celerity is up. Use Armor of EarthCoreElementalist. Earth Magic 12Armor of EarthEnchantment SpellFor 30 seconds, you gain 53 armor, but move 21% slower.10¾15 when needed (always maintain it in the burning forest, due to large damage from inferno). Also use Mental BlockEotNNo Profession. Asura rank Mental BlockEnchantment SpellFor 5..11 seconds you have a 50% chance to block attacks. This Enchantment is reapplied every time an enemy strikes you. PvE only.10115 in heavy mob areas and when you are around skeletal impalers.
Use "I Am Unstoppable!"EotNNo Profession. Norn rank "I Am Unstoppable!"ShoutFor 16..20 seconds, you have +24 armor and cannot be knocked down or Crippled. PvE only.530 for Abyssals, and Shadow Warriors (If your health is below 50%). Alternatively, you can use IAU when Shadow Form skill recharge is around 70-100%, IAU provides protection when Shadow Form runs out and when casting it.
Use Death's ChargeFactionsAssassin. Shadow Arts 17Death's ChargeSpellShadow Step to target foe. If that foe has more Health than you, you are healed for 218.5¼30 as a self-heal or a method for getting unstuck.
Aggro mobs, then use Ebon Battle Standard of HonorEotNNo Profession. Ebon Vanguard rank Ebon Battle Standard of HonorWard SpellYou plant an Ebon Battle Standard of Honor at your current location. For 14..20 seconds, non-Spirit allies in this area strike for +8..15 damage and an additional +7..10 vs. Charr. PvE only.10120 and then use Sliver ArmorFactionsElementalist. Earth Magic 12Sliver ArmorEnchantment SpellFor 10 seconds, you have 45% chance to block attacks and whenever you are the target of a hostile Spell or attack one nearby foe is struck for 29 earth damage.10130
It is highly recommended to use a speed boost consumable e.g. Birthday Cupcakes or Blue Rock Candy to counteract the speed loss from Armor of EarthCoreElementalist. Earth Magic 13Armor of EarthEnchantment SpellFor 30 seconds, you gain 55 armor, but move 19% slower.10¾15.
FactionsAssassin. Shadow Arts 16Shadow FormElite Enchantment SpellFor 22 seconds, you cannot be the target of enemy Spells, and you gain 5 damage reduction for each Assassin enchantment on you. You cannot deal more than 26 damage with a single skill or attack.5130
FactionsAssassin. Shadow Arts 16Shroud of DistressEnchantment SpellFor 62 seconds, if you are below 50% Health, you have 8 health regeneration and a 75% chance to block attacks.10145
EotNNo Profession. Ebon Vanguard rank Ebon Battle Standard of HonorWard SpellYou plant an Ebon Battle Standard of Honor at your current location. For 14..20 seconds, non-Spirit allies in this area strike for +8..15 damage and an additional +7..10 vs. Charr. PvE only.10120
FactionsElementalist. Earth Magic 13Sliver ArmorEnchantment SpellFor 10 seconds, you have 47% chance to block attacks and whenever you are the target of a hostile Spell or attack one nearby foe is struck for 31 earth damage.10130
FactionsAssassin. Shadow Arts 17Death's ChargeSpellShadow Step to target foe. If that foe has more Health than you, you are healed for 218.5¼30
Template code
Optional 1:
"I Am Unstoppable!"EotNNo Profession. Norn rank "I Am Unstoppable!"ShoutFor 16..20 seconds, you have +24 armor and cannot be knocked down or Crippled. PvE only.530 or Dwarven StabilityEotNNo Profession. Deldrimor rank Dwarven StabilityEnchantment SpellFor 24..30 seconds, your Stances last 55..100% longer. If you activated this Skill while drunk, you cannot be knocked down. PvE only.5¼30
Optional 6 & 7:
Great Dwarf ArmorEotNNo Profession. Deldrimor rank Great Dwarf ArmorEnchantment SpellFor 22..40 seconds, target ally has +24 armor, +60 maximum Health, and an additional +24 armor against Destroyers. PvE only.5110
Mental BlockEotNNo Profession. Asura rank Mental BlockEnchantment SpellFor 5..11 seconds you have a 50% chance to block attacks. This Enchantment is reapplied every time an enemy strikes you. PvE only.10115
Glyph of ConcentrationPropheciesElementalist. UnlinkedGlyph of ConcentrationGlyphFor 15 seconds, your next 1 Spell cannot be interrupted and ignore the effects of being Dazed.5110
Heart of ShadowFactionsAssassin. Shadow Arts Heart of ShadowSpellYou are healed for 30..126..158, and you Shadow Step to a nearby location directly away from your target.5¼15
"Finish Him!"EotNNo Profession. Norn rank "Finish Him!"ShoutIf target foe has less than 50% Health, that foe takes 44..80 damage and suffers from Cracked Armor and a Deep Wound for 12..20 seconds. PvE only.1015
"You Move Like a Dwarf!"EotNNo Profession. Norn rank "You Move Like a Dwarf!"ShoutTarget foe is knocked down and takes 44..80 damage. When that foe gets up, it is Crippled for 8..15 seconds. PvE only.1010
Infiltrator, Saboteur and Vanguard armor sets advised all Terra's for armor buff when taking more offensively orientated builds.
Usage[]
Maintain Shadow FormFactionsAssassin. Shadow Arts 17Shadow FormElite Enchantment SpellFor 23 seconds, you cannot be the target of enemy Spells, and you gain 5 damage reduction for each Assassin enchantment on you. You cannot deal more than 28 damage with a single skill or attack.5130 and Armor of EarthCoreElementalist. Earth Magic 13Armor of EarthEnchantment SpellFor 30 seconds, you gain 55 armor, but move 19% slower.10¾15. This only works when Essence of Celerity is up. Also maintain Shroud of DistressFactionsAssassin. Shadow Arts 17Shroud of DistressEnchantment SpellFor 64 seconds, if you are below 50% Health, you have 9 health regeneration and a 75% chance to block attacks.10145.
Use "I Am Unstoppable!"EotNNo Profession. Norn rank "I Am Unstoppable!"ShoutFor 16..20 seconds, you have +24 armor and cannot be knocked down or Crippled. PvE only.530 for Abyssals, and Shadow Warriors (If your health is below 50% and when affected by Mental Block).
Use Death's ChargeFactionsAssassin. Shadow Arts 17Death's ChargeSpellShadow Step to target foe. If that foe has more Health than you, you are healed for 218.5¼30 as a self-heal or a method for getting unstuck.
Use Glyph of ConcentrationPropheciesElementalist. UnlinkedGlyph of ConcentrationGlyphFor 15 seconds, your next 1 Spell cannot be interrupted and ignore the effects of being Dazed.5110 before activating Shadow FormFactionsAssassin. Shadow Arts 17Shadow FormElite Enchantment SpellFor 23 seconds, you cannot be the target of enemy Spells, and you gain 5 damage reduction for each Assassin enchantment on you. You cannot deal more than 28 damage with a single skill or attack.5130 while in the spider cave.
FactionsAssassin. Shadow Arts 16Shadow FormElite Enchantment SpellFor 22 seconds, you cannot be the target of enemy Spells, and you gain 5 damage reduction for each Assassin enchantment on you. You cannot deal more than 26 damage with a single skill or attack.5130
FactionsAssassin. Shadow Arts 16Shroud of DistressEnchantment SpellFor 62 seconds, if you are below 50% Health, you have 8 health regeneration and a 75% chance to block attacks.10145
PropheciesElementalist. UnlinkedGlyph of ConcentrationGlyphFor 15 seconds, your next 1 Spell cannot be interrupted and ignore the effects of being Dazed.5110
EotNNo Profession. Ebon Vanguard rank Ebon Battle Standard of HonorWard SpellYou plant an Ebon Battle Standard of Honor at your current location. For 14..20 seconds, non-Spirit allies in this area strike for +8..15 damage and an additional +7..10 vs. Charr. PvE only.10120
FactionsElementalist. Earth Magic 12Sliver ArmorEnchantment SpellFor 10 seconds, you have 45% chance to block attacks and whenever you are the target of a hostile Spell or attack one nearby foe is struck for 29 earth damage.10130
FactionsAssassin. Shadow Arts 16Death's ChargeSpellShadow Step to target foe. If that foe has more Health than you, you are healed for 209.5¼30
Template code
Optionals[]
Armor of EarthCoreElementalist. Earth Magic Armor of EarthEnchantment SpellFor 30 seconds, you gain 24..53..62 armor, but move 50..21..12% slower.10¾15 (To cover T1)
Heart of ShadowFactionsAssassin. Shadow Arts Heart of ShadowSpellYou are healed for 30..126..158, and you Shadow Step to a nearby location directly away from your target.5¼15 (Speed, self heal and shadow step down after killing Shard Wolf)
"Finish Him!"EotNNo Profession. Norn rank "Finish Him!"ShoutIf target foe has less than 50% Health, that foe takes 44..80 damage and suffers from Cracked Armor and a Deep Wound for 12..20 seconds. PvE only.1015 (Trigger Edge of Extinction)
Unseen FuryFactionsAssassin. Shadow Arts Unseen FuryStanceAll adjacent foes are Blinded for 3..9..10 seconds. For 10..26..31 seconds, you cannot be blocked by Blinded foes. 520 (Extra anti rupt and easier tanking)
Maintain Shadow FormFactionsAssassin. Shadow Arts 17Shadow FormElite Enchantment SpellFor 23 seconds, you cannot be the target of enemy Spells, and you gain 5 damage reduction for each Assassin enchantment on you. You cannot deal more than 28 damage with a single skill or attack.5130. This only works when Essence of Celerity is up. Also maintain Shroud of DistressFactionsAssassin. Shadow Arts 17Shroud of DistressEnchantment SpellFor 64 seconds, if you are below 50% Health, you have 9 health regeneration and a 75% chance to block attacks.10145.
Use "I Am Unstoppable!"EotNNo Profession. Norn rank "I Am Unstoppable!"ShoutFor 16..20 seconds, you have +24 armor and cannot be knocked down or Crippled. PvE only.530 for Abyssals, and Shadow Warriors (If your health is below 50%).
Use Death's ChargeFactionsAssassin. Shadow Arts 17Death's ChargeSpellShadow Step to target foe. If that foe has more Health than you, you are healed for 218.5¼30 as a self-heal or a method for getting unstuck.
Use Glyph of ConcentrationPropheciesElementalist. UnlinkedGlyph of ConcentrationGlyphFor 15 seconds, your next 1 Spell cannot be interrupted and ignore the effects of being Dazed.5110 before activating skills when you are around worms.
Ask for the SoS to take Griffins if you need to cover another Terra.
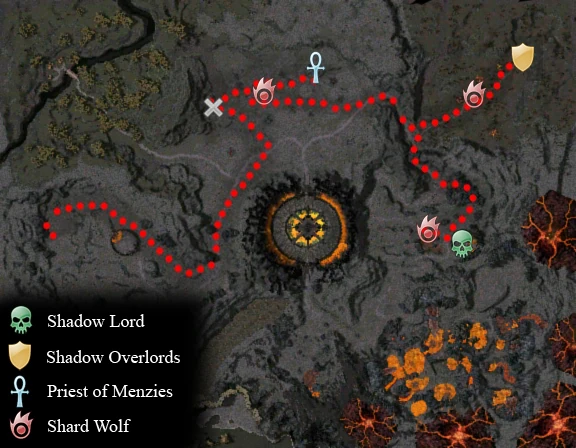
Walkthrough[]
Terra #1[]
Terra One Route
Start
Run to the Camp and aggro the caster group and the group with beserkers in. Use the aggro from the shadow rangers to sliver the beserkers down and then sliver the shadow group, starting with the monk. Avoid the skeleton patrol that comes down from the north. When the shadow group is dead, get the quests from The Eternal Weaponsmith and Kromril The Eternal.
Run to Priest of Menzies, aggroing as much as possible, as soon as you get a group with beserkers in, stop to sliver them down. Make sure you grab the two groups near the entrance to the burning forest and pull them back beneath menzies. When all the melee is dead, Death's Charge up to menzies and sliver him down. Pick the book up and run back to Kromril the Eternal, making sure to drop the book before recasting Shadow Form. If you wish, you can sliver the shard wolf on your way back to the camp.
If you haven't already, sliver the Shard Wolf in the middle of the battlefield.
Run through the burning forest and aggro the group of Mahgo Hydras near the Shadow Overlords. Pull them back along the right wall until the Smoke Walkers are at longbow range and then sliver the hydras down. If smoke walkers run up to heal the hydras, let sliver run out and wait until the hydras are back to full health, then pull them back again. Once the hydras are dead, run into the middle of the shadow groups and sliver the overlords down.
Run to the Tower of Strength, you may have to wait for the quest to be taken. Pull the first 2 Shadow Patrols one by one and sliver them down, once you have 4 rangers you can aggro one of the abyssal groups and sliver the abyssals down, keep pulling and slivering the melee until they are all dead. Use cliff walls to block them if you have more than 3 attacking you. Once the melee is all dead. begin slivering the Shadow Rangers, you can pull the Shard Wolf wolf to help with this if you want. Do not try and sliver more than 3 at one time and if they are very balled up, run down towards the burning forest until some break aggro so you can sliver them easily. Make sure you don't kill the mesmers, as you will need them later. When all the rangers are dead, ask the T2 to send the Tower Mage. While you are waiting for the mage to arrive, pull the Shard Wolf back and use the Shadow Mesmers to kill it.
When the Tower Mage gets there, pull the Shadow Lord out of the tower and sliver him down.
●●● - This is path where the Seeds of Corruption are. If you had trouble with the first wolf then ask where T1 currently is. If he is almost finished at Tower of Strength, wait outside forge so you can trigger the Tower Mage straight away.
●●● - Follow the yellow line to Lord Khobay. To kill, pull the drakes by the Giant Wurm with you, so you can get more aggro. Be careful not to let the drakes bodyblock the exit, then walk pass the Giant Wurm by Khobay. Death Charge to Khobay and sliver him to death. Now trigger mage if you have not already done so.
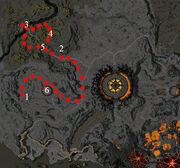
Terra #3[]
Terra Three Route
Start
Run to the wailing forest and grab all of the spirit shepherds you can, then sliver down the rock borer worms and the 2 spirit woods in the entrance to the forest.
Run to the bridge, sliver the 4 berserkers on the close side of the bridge and then use a bow to aggro the banshees, avoiding the two skeletal groups from the side. sliver the banshees down on the bridge and then take the quest from the wailing lord (make sure the team is off the battlefield before doing this).
Run up the hill and kill the shard wolf.
Death's charge down to a spider, pulling them along the path towards the wailing lord so you can death's charge down. Once this is done aggro all the shepherds again and use their aggro to sliver the nearby skeleton group down. Once the skeleton group is dead simply ball the shepherds up together and wait for the main team to arrive.
Once the shepherd group has been spiked wait until the main team is ready and then escort the griffons to the tower of courage, pinging targets to make them follow you.
If either of the terras die, it is your job to cover their areas.
How to spike: Perma balls groups tightly, the ineptitude mesmer then calls arcane conundrum on a central target and all 3 spikers use their spike skills on that target.
Clear the way to the Tower of Courage and complete Rastigan's quest. Most likely the Rit will stay back to complete the quest while the rest continues ahead.
Clear the way to the Temple of War and clear it so the Eternal Forgemaster appears. Terra 1 takes the quests so you can go directly to the Temple of War.
Take the first quest once the Perma is waiting on the south side of the forge. Pull them towards the middle and kill. Once they are dead, the sin and two warriors should stand on the corpses to kill so the new Beast's that spawn don't jump around. Do the same for the North side.
Head to the wailing forest and spike the spirit shepherd group that the t3 is holding. (If the t3 has died or is covering another terra then you should spike your way to the wailing lord.)
The main team should clear the way back to the Tower of Courage. Once you are almost there, tell the t3 he/she can come with Griffons.
Pull and kill the last Shard Wolf. Wait in the Tower until the griffons get there, then head to forge for your reward.
FactionsAssassin. Shadow Arts 12Shadow FormElite Enchantment SpellFor 18 seconds, you cannot be the target of enemy Spells, and you gain 5 damage reduction for each Assassin enchantment on you. You cannot deal more than 21 damage with a single skill or attack.5130
FactionsAssassin. Shadow Arts 12Shroud of DistressEnchantment SpellFor 54 seconds, if you are below 50% Health, you have 7 health regeneration and a 75% chance to block attacks.10145
EotNNo Profession. Deldrimor rank Dwarven StabilityEnchantment SpellFor 24..30 seconds, your Stances last 55..100% longer. If you activated this Skill while drunk, you cannot be knocked down. PvE only.5¼30
CoreRanger. Expertise 19Whirling DefenseStanceFor 23 seconds, you have 75% chance to block attacks. Whenever you block a projectile in this way, adjacent foes take 13 damage.260
FactionsAssassin. Shadow Arts 15Death's ChargeSpellShadow Step to target foe. If that foe has more Health than you, you are healed for 200.5¼30
Template code
Optionals[]
Heart of ShadowFactionsAssassin. Shadow Arts Heart of ShadowSpellYou are healed for 30..126..158, and you Shadow Step to a nearby location directly away from your target.5¼15 (Shadow step and self heal).
"I Am Unstoppable!"EotNNo Profession. Norn rank "I Am Unstoppable!"ShoutFor 16..20 seconds, you have +24 armor and cannot be knocked down or Crippled. PvE only.530 (Additional armor and anti cripple).
"Finish Him!"EotNNo Profession. Norn rank "Finish Him!"ShoutIf target foe has less than 50% Health, that foe takes 44..80 damage and suffers from Cracked Armor and a Deep Wound for 12..20 seconds. PvE only.1015
Shadow SanctuaryFactionsAssassin. Kurzick rank Shadow Sanctuary (Kurzick)Enchantment SpellYou are Blinded for 10 seconds. For 10 seconds, you gain +5..10 Health regeneration and +40 armor. PvE only.5¼30 (Additional armor and damage reduction)
Mental BlockEotNNo Profession. Asura rank Mental BlockEnchantment SpellFor 5..11 seconds you have a 50% chance to block attacks. This Enchantment is reapplied every time an enemy strikes you. PvE only.10115
Dark EscapeFactionsAssassin. Shadow Arts Dark EscapeStanceFor 5..13..16 seconds, you move 25% faster and take half damage. Dark Escape ends if you successfully hit with an attack.530
DashFactionsAssassin. UnlinkedDashStanceFor 3 seconds, you run 50% faster.58 (Used with Dwarven Stability for Perma Dash).
Equipment[]
Weapons: single handed 20% enchantment weapon, +10AL vs Blunt Shield.
Maintain Shadow FormFactionsAssassin. Shadow Arts 17Shadow FormElite Enchantment SpellFor 23 seconds, you cannot be the target of enemy Spells, and you gain 5 damage reduction for each Assassin enchantment on you. You cannot deal more than 28 damage with a single skill or attack.5130. This only works when Essence of Celerity is up. Also maintain Shroud of DistressFactionsAssassin. Shadow Arts 17Shroud of DistressEnchantment SpellFor 64 seconds, if you are below 50% Health, you have 9 health regeneration and a 75% chance to block attacks.10145.
Use "Dwarven Stability"EotNNo Profession. Deldrimor rank Dwarven StabilityEnchantment SpellFor 24..30 seconds, your Stances last 55..100% longer. If you activated this Skill while drunk, you cannot be knocked down. PvE only.5¼30 for Abyssals, and Shadow Warriors (If your health is below 50%).
Use Death's ChargeFactionsAssassin. Shadow Arts 17Death's ChargeSpellShadow Step to target foe. If that foe has more Health than you, you are healed for 218.5¼30 as a self-heal or a method for getting unstuck.
FactionsAssassin. Shadow Arts 17Shadow FormElite Enchantment SpellFor 23 seconds, you cannot be the target of enemy Spells, and you gain 5 damage reduction for each Assassin enchantment on you. You cannot deal more than 28 damage with a single skill or attack.5130
FactionsAssassin. Shadow Arts 17Shroud of DistressEnchantment SpellFor 64 seconds, if you are below 50% Health, you have 9 health regeneration and a 75% chance to block attacks.10145
EotNNo Profession. Ebon Vanguard rank Ebon Battle Standard of HonorWard SpellYou plant an Ebon Battle Standard of Honor at your current location. For 14..20 seconds, non-Spirit allies in this area strike for +8..15 damage and an additional +7..10 vs. Charr. PvE only.10120
FactionsElementalist. Earth Magic 13Sliver ArmorEnchantment SpellFor 10 seconds, you have 47% chance to block attacks and whenever you are the target of a hostile Spell or attack one nearby foe is struck for 31 earth damage.10130
FactionsAssassin. Shadow Arts 17Death's ChargeSpellShadow Step to target foe. If that foe has more Health than you, you are healed for 218.5¼30
Template code
Optionals[]
Optional 3:
"I Am Unstoppable!"EotNNo Profession. Norn rank "I Am Unstoppable!"ShoutFor 16..20 seconds, you have +24 armor and cannot be knocked down or Crippled. PvE only.530 or Dwarven StabilityEotNNo Profession. Deldrimor rank Dwarven StabilityEnchantment SpellFor 24..30 seconds, your Stances last 55..100% longer. If you activated this Skill while drunk, you cannot be knocked down. PvE only.5¼30
Optional 6 & 7:
DashFactionsAssassin. UnlinkedDashStanceFor 3 seconds, you run 50% faster.58 (Used with Dwarven Stability for Perma Dash).
Windborne SpeedPropheciesElementalist. Air Magic Windborne SpeedEnchantment SpellFor 5..11..14 seconds, target ally moves 33% faster.10¾5 (Increase speed of Tower Mage).
"Finish Him!"EotNNo Profession. Norn rank "Finish Him!"ShoutIf target foe has less than 50% Health, that foe takes 44..80 damage and suffers from Cracked Armor and a Deep Wound for 12..20 seconds. PvE only.1015 (Faster Priest of Menzies).
"You Move Like a Dwarf!"EotNNo Profession. Norn rank "You Move Like a Dwarf!"ShoutTarget foe is knocked down and takes 44..80 damage. When that foe gets up, it is Crippled for 8..15 seconds. PvE only.1010
Equipment[]
Weapons: single handed 20% enchantment weapon, +10AL vs Piercing & Slashing Shield.
Infiltrator's, Saboteur's and Vanguard armor sets advised all Terra's for armor buff when taking more offensively orientated builds.
Usage[]
Maintain Shadow FormFactionsAssassin. Shadow Arts 17Shadow FormElite Enchantment SpellFor 23 seconds, you cannot be the target of enemy Spells, and you gain 5 damage reduction for each Assassin enchantment on you. You cannot deal more than 28 damage with a single skill or attack.5130. This only works when Essence of Celerity is up. Also maintain Shroud of DistressFactionsAssassin. Shadow Arts 17Shroud of DistressEnchantment SpellFor 64 seconds, if you are below 50% Health, you have 9 health regeneration and a 75% chance to block attacks.10145.
Use "I Am Unstoppable!"EotNNo Profession. Norn rank "I Am Unstoppable!"ShoutFor 16..20 seconds, you have +24 armor and cannot be knocked down or Crippled. PvE only.530 for Abyssals, and Shadow Warriors (If your health is below 50%).
Use Death's ChargeFactionsAssassin. Shadow Arts 17Death's ChargeSpellShadow Step to target foe. If that foe has more Health than you, you are healed for 218.5¼30 as a self-heal or a method for getting unstuck.
Walkthrough[]
T1:
Get Slaves of Menzies from Miko the Unchained, proceed past the Tower of Strength towards the Spider Cave and get The Hunt from Nimros the Hunter.
Head back to the Burning Forest complete the quest and kill the Shard Wolf located there.
Complete the Tower of Strength quest. (Do not kill the Shadow Mesmers)
Complete the Khobay the Betrayer quest.
T2:
Pop the NPC's at the Battle Camp, take all quests.
Complete Army of Darkness and kill the Shard Wolf in the Battlefield.
Head into the Forge and tank the north side during the Defend the Temple of War quest.
Kill the Shard Wolf at the Beach slivering down the Seeds of Corruption as you make your way to the cave entrance.
Kill the Shard Wolf at the Spider Cave entrance, proceed towards the Forge triggering the Tower Mage.
Head to the Tower of Strength complete the quest and sliver down the Shard Wolf.
 /
/


 Armor of Earth instead of
  Unseen Fury
  "We Shall Return!"


 Priest of Menzies, aggroing as much as possible, as soon as you get a group with beserkers in, stop to sliver them down. Make sure you grab the two groups near the entrance to the burning forest and pull them back beneath menzies. When all the melee is dead, Death's Charge up to menzies and sliver him down. Pick the book up and run back to Kromril the Eternal, making sure to drop the book before recasting Shadow Form. If you wish, you can sliver the shard wolf on your way back to the camp.
 Shard Wolf in the middle of the battlefield.
 Shadow Overlords. Pull them back along the right wall until the Smoke Walkers are at longbow range and then sliver the hydras down. If smoke walkers run up to heal the hydras, let sliver run out and wait until the hydras are back to full health, then pull them back again. Once the hydras are dead, run into the middle of the shadow groups and sliver the overlords down.
 Shadow Lord out of the tower and sliver him down.
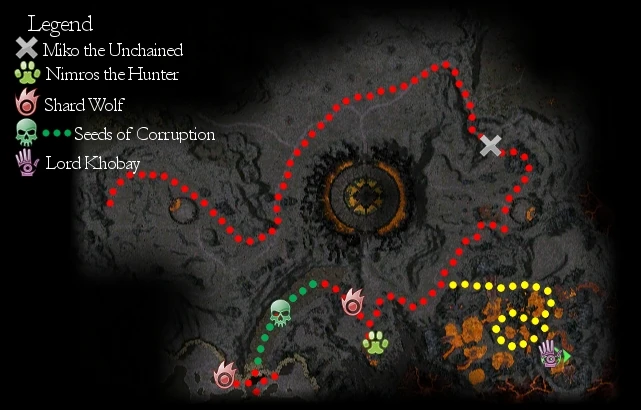

 Nimros the Hunter
 Lord Khobay. To kill, pull the drakes by the Giant Wurm with you, so you can get more aggro. Be careful not to let the drakes bodyblock the exit, then walk pass the Giant Wurm by Khobay. Death Charge to Khobay and sliver him to death. Now trigger mage if you have not already done so.
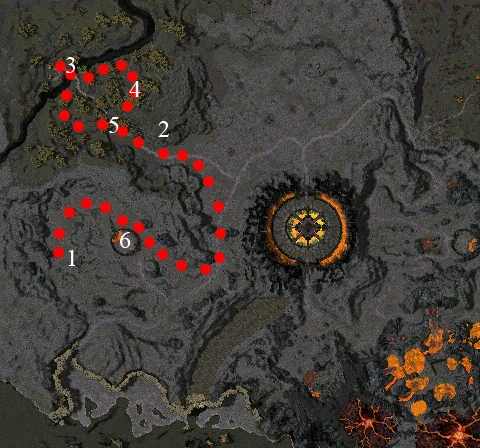

