| NOTE: This template should be replaced with {{Real-Vetting}} |
|
The PvXwiki community finds this to be an excellent build. Through the PvX vetting system, it has reached an overall rating in the range from 4.75 to 5.0 and thus qualifies for the highest category of working builds: Great. This build has been designed for the following use: |
| |
This is part of the Dungeon Build series, see Dungeon Guide for all Dungeon builds. |
| This build requires Consumables to operate properly. |
Kathandrax Manly Spike team is designed to finish Catacombs of Kathandrax fast in hard mode. It uses Vow of Strength for AoE damage and Way of the Assassin for high single target damage. This team requires two essences to work.
Overview
Tanks: ![]()
![]() ,
, ![]()
![]()
Spikers: ![]()
![]() ,
,![]()
![]()
Backline: ![]()
![]() ,
,![]()
![]()
Main Tank
You have an additional 9% chance to critical hit. Whenever you critical hit, you get 2 Energy.  Template code |


- Stoneflesh Aura or Armor of Earth over Dwarven Stability for an easier level 3.
Equipment
- Weapon with 20% enchanting and +5 energy. +10 AR vs Piercing, Blunt and Fire shield.
- Longbow for pulling.
- Blessed armor and vitae runes.
Runner Tank
You have an additional 9% chance to critical hit. Whenever you critical hit, you get 2 Energy. Template code |

- Great Dwarf Weapon over Ebon Vanguard Assassin Support.
Equipment
- Weapon with 20% enchanting and +5 energy. +10 AR vs Piercing, Blunt and Fire shield.
- Longbow for pulling.
- Blessed armor and vitae runes.
Vow of Strength Dervish
The energy cost of Dervish enchantments is reduced by 40%. In PvE, gain +10 armor rating while enchanted. Template code |


Equipment
- tba
Usage
- tba
Way of the Assassin
12 + 1 + 3 12 + 1 You have an additional 13% chance to critical hit. Whenever you critical hit, you get 3 Energy. Template code |


Equipment
- Zealous Daggers.
- Defensive set for running.
Usage
- Spam attack skills.
Seeder Monk
Your allies are healed for 35 Health whenever you cast Monk spells on them. Template code |


Equipment
- Enchanting set.
- Defensive set for running.
- Survivor and vitae runes.
Usage
- Use Seed of Life on a player with Life Bond to heal the party.
- Maintain Strength of Honor on your damage dealers for more damage.
- At Ilsundur, alternate between seeds on the player using Barbs.
Barbs


Equipment
- Enchanting set.
- Defensive set for running.
- Survivor and vitae runes.
Usage
- Bond the tanks for party heals.
- Curse enemies.
- Maintain Great Dwarf Weapon on melee allies.
Guide
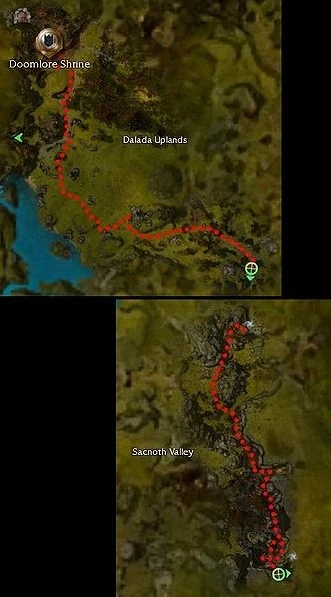
Start from Doomlore or Longeye's Ledge. An Assassin runs to the dungeon. Only one person in the party needs to have the quest from Swithin Nye outside the dungeon.

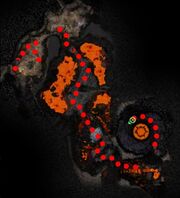
Map to the dungeon
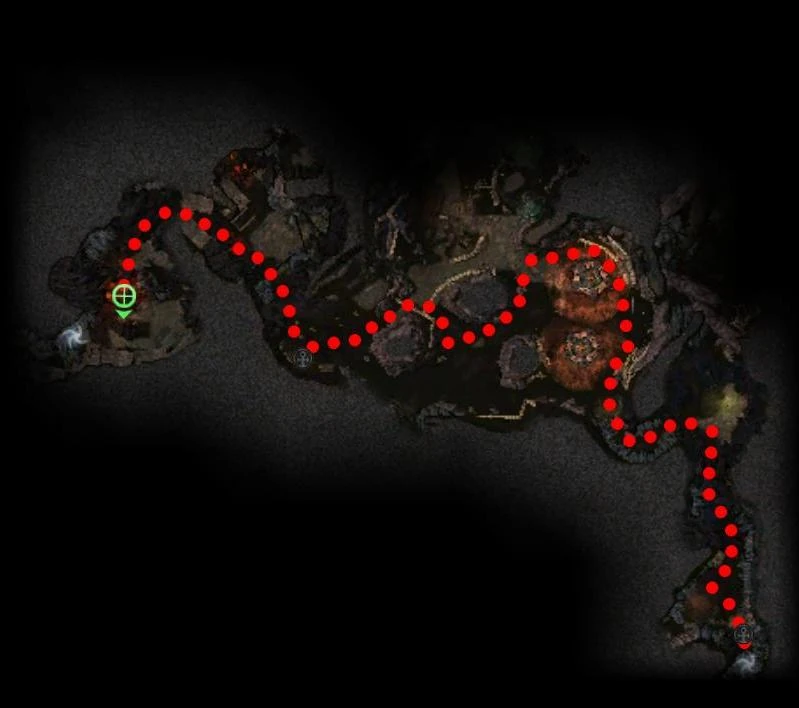
First Level
- Run past enemies along the route. The tank may wish to pull some away from the team.
- The team makes their way to the Infernal Siege Wurm and kills it. The runner heads to the gate.
- When the key is picked up the runner can head for the second level.
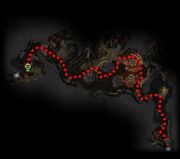
Second Level
- This level can easily be ran by the tanks. No essence is needed if they use Cupcakes.
- Head to the boss and kill it. Try to lose aggro from the nearby enemies before doing so.
- Once the boss is dead, the key is picked up and an Assassin can proceed to the final level. Remember to use IAU right after the dungeon lock as the Infernal Wurm popup will knock you down as it spawns.
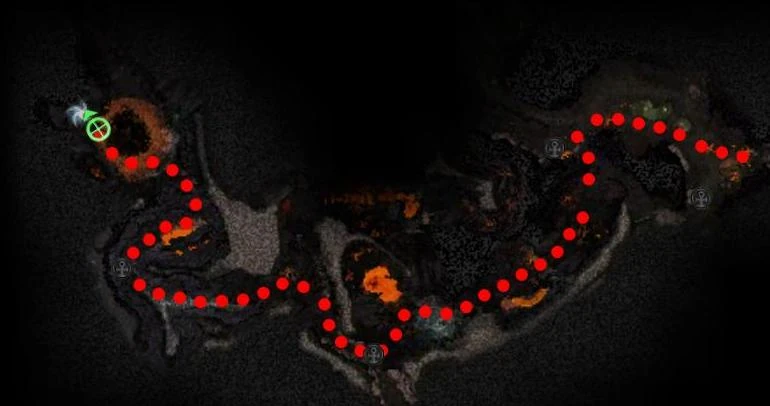
Third Level
- When you load inside, everyone should be immediately hug the wall. Pull a Becalmed Djinn with a longbow and kill it. Killing him will cause all monsters within this room to start roaming around.
- Now, using recall on a team member, a tank can go pull the whole room away from the exit. The other tank jumps into the group of elementals hanging at the doorway to the second room, and the team kills it. The tank can then pull the mobs in the second room away, giving room for the team to hug the wall and kill the boss spawn.
- Pick up the key and use it to enter the next room. Make your way along the route. The tanks may wish to pull some of the mobs out of the way. Ebon Escape can be used on the Beacon of Droknar down the hill.
- A tank should use recall and pull the next room to the far side while the others run past. It is likely the main team will get aggro due to the enemy spirits, but a quick dash to the boss room and good blocking by the tank should mean there are no problems.
- Be sure to avoid the fire balls that pop and roll around when you aggro the boss.
- Kill Ilsundur. Seed of Life and Healing Seed should be cast on the necromancer for strong party-wide heals to help keep everybody alive (The Necro can go into melee range so Healing Seed keeps the attackers alive). All Fire Bombs should be dropped away from other players. Once the boss is dead, be careful for fire balls as they still move around the chamber while you get the chest.
  |
  |
  |
| First Level | Second Level | Third Level |
|---|
Notes
- This dungeon can be repeated as many times as you like without the need to go back to town, and the Hammers of Kathandrax can be stacked up without accepting the quest reward.