| NOTE: This template should be replaced with {{Real-Vetting}} |
|
The PvXwiki community finds this to be an excellent build. Through the PvX vetting system, it has reached an overall rating in the range from 4.75 to 5.0 and thus qualifies for the highest category of working builds: Great. This build has been designed for the following use: |
| |
This is part of the Dungeon Build series, see Dungeon Guide for all Dungeon builds. |
Team build used to complete the 4 sub-bosses of Slaver's Exile in NM and Duncan in HM.
Overview
Sub-Dungeons
![]() /
/![]() Ctt Leader x1
Ctt Leader x1
![]() /
/![]() Lava x5
Lava x5
![]() /
/![]() Storm x2
Storm x2
Duncan
![]() /
/![]() Sliver Tank x1
Sliver Tank x1
![]() /
/![]() Swap Runners x7
Swap Runners x7
Ctt Leader
You have an additional 3% chance to critical hit. Whenever you critical hit, you get 1 Energy.  Template code |


Equipment
- Blessed Insignias
- Weapon of Enchanting, +10 vs Piercing shield
Usage
- Lead the main group. Swap out Spirits of Disenchantment. Use CTT for Restless Dead. Use FB for added speed and healing. Use EE for heal and to stay grouped. Use WSR to rez team mates.
Variant
- Ebon Battle Standard of Honor instead of Swap.
- Death's Charge instead of Ebon Escape.
Lava
You have an additional 3% chance to critical hit. Whenever you critical hit, you get 1 Energy. Template code |


Equipment
- Blessed Insignias
- Weapon of Enchanting, +10 vs Piercing shield
Usage
- Use EE to heal and stay with group. EE in for spikes → Gole → optional → Lava Font/Fire Storm
Storm
You have an additional 3% chance to critical hit. Whenever you critical hit, you get 1 Energy. Template code |


Equipment
- Blessed Insignias
- Weapon of Enchanting, +10 vs Piercing shield
Usage
- Use EE to heal and stay with other spikers. Use CoP to interrupt Rez skills and heals. Get keys for Selve and Forge.
- Primary targets are Distracter, Dominator, Dreamer, Cleaver, Summmoner and Blasphemer.
Swap Runners
You have an additional 3% chance to critical hit. Whenever you critical hit, you get 1 Energy. Template code |

 "We Shall Return!" - pickup dead tanks.
- Godspeed - stacked movement buffs help break aggro
- Death's Charge - movement
- Shadow Sanctuary - cover for moving Spirits of Disenchantment
Equipment
- Blessed Insignias
- Weapon of Enchanting, +10 vs Piercing shield
Usage
- Chain Fall Back and "Can't Touch This!" with the other A/Ps. Stay with the Sliver tank(s) until the last chamber. Renew CTT before tank goes on to Duncan platform.
Sliver/Swap
You have an additional 3% chance to critical hit. Whenever you critical hit, you get 1 Energy. Template code |


Equipment
- Blessed Insignias
- Weapon of Enchanting, +10 vs Piercing shield
- Earth Staff of Enchanting
Usage
- Maintain SF and shroud. Run with the A/Ps to the last chamber. Being sure to get CTT! from an A/P, and attempting to lose aggro from any Dwarf groups, run up to Duncan and use Honor → Stoneflesh → Sliver chain to kill Duncan.
Team Usage
- Thommis Be sure to use IAU near Modniir and use EE to keep up with the group. Run all the way to the alcove in the wall. The A/P will now drag all the Stone Summit into a ball and ping, EE to the A/P when they do ping. While trying to bodyblock as many dwarfs as possible, spike. The key targets are the Summoners, followed by anything with a resurrect such as Dominators (Resurrection Chant), Cleavers (Signet of Return) and other meleers with Resurrection Signet. Keep using EE to heal yourself and others - especially if anticipating Death Nova explosions. Once all the dwarves are dead, get your loot from the chest. As usual, the A/Me should use Swap to remove any Spirits of Disenchantment out of the path of the team.
- Rand With the same Essence, run back to the start through the now open wall, and then run all the way to the Beacon near Rand Stormweaver's group. Once everyone has caught up, follow the A/P up through the large Thorn Wolf mobs, and here the A/P should use "Fall Back!" to help break aggro from the wolves. Once behind Rand's group, go to the corner behind the rock - you will likely be interrupted by Choking Gas so spread out slightly. (If you lose Shadow Form when running to Rand, go away from Rand - otherwise the Blasphemer will use Well of the Profane, and your team will die. Ideally, the A/P should go stand beside Rand, and setup Honor and the team should EE and spike. The A/Me should interrupt Choking Gas on the Distractor, Well of the Profane on the Blasphemer, and when everything else is dead, Troll Unguent on Rand. Pick up the loot and run back to the entrance to the dungeon.
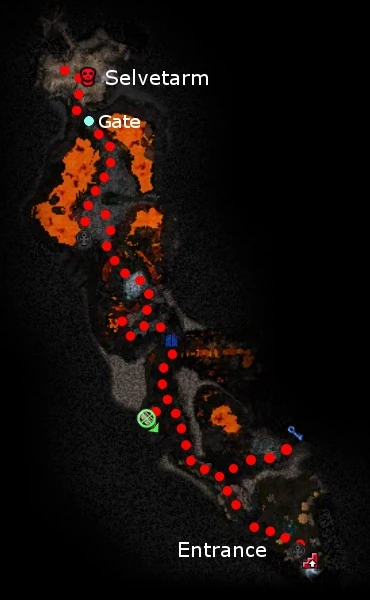
- Selve Send 1 player off to get the key (there is a good chance the key person will get killed by Spirits of Disenchantment or Choking Gas, if bodyblocked, pop a summon and EE). The rest of the group should run on the left path to the gate. Going through the unlocked gate the team should run to the next gate. The A/Me or A/P will swap out any Spirit of Disenchantment if one spawns (to behind the rock pillar)and the rest of group will start spiking. Stay balled as much as possible. Once the crypt slashers spawn the A/P will need to start using "Can't Touch This!". Stay balled and spike down the Restless Spirit touchers (if the group keeps wiping, the A/Me can solo the Restless from a distance with Wastrel's Demise and Cry of Frustration). Continue until the gate opens. The A/P will run into Selvetarm's group to ball them and it will then ping for the spike.
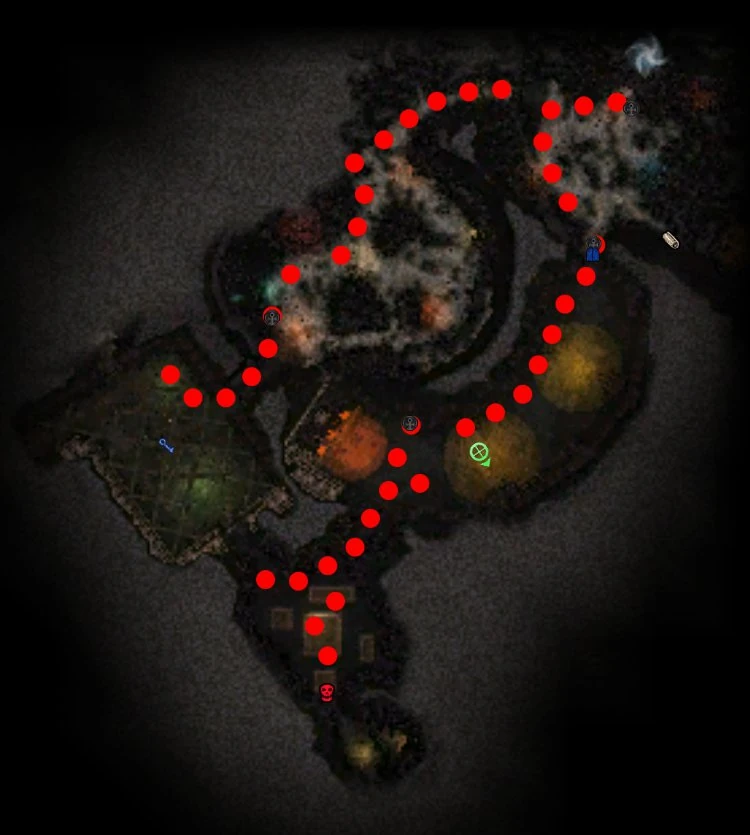
- Forge The entire team should run to the room with the Forge Imps, after killing one of them, the Dark Watcher will spawn. Pull it with a longbow into the corner, and have everyone spike. Remember to use IAU! to avoid people getting killed by Ancestors' Rage. After collecting the key, run back to the start and through the boss lock gate and all the way to Forgewight's chamber. The team should head to the right hand side. If there are Spirits of Disenchantment, have them removed. The A/P will now pull all of the foes in the room into a ball and call for the spike. Collect chest and resign once done.
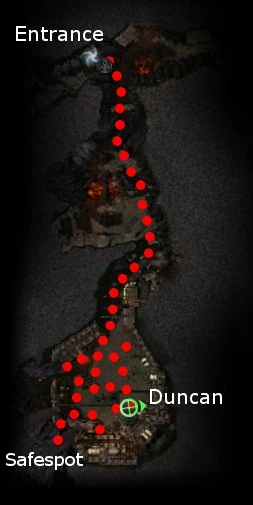
- Duncan Head back to the outpost and switch to Hard mode. Run back to the dungeon into Duncan's section and use a full conset. The runners should help carry the Sliver tanks through the dungeon with "Can't Touch This!" and "Fall Back!". At the final room the runners should swap all the Spirits of Disenchantment (it can also be helpful to remove any Spirits of Shadowsong since the tank can use zealous to manage energy) away from the platform Duncan resides on, aim to move the Disenchantment spirits into corners away from the entrance to the platform so that the A/E can run through safely. With A/Ps pulling the rest of the dwarves away, a sliver tank will kill Duncan. Collect chest + gg. Run back through the now mostly empty dungeon to receive the reward.
Maps:
Duncan
Selvetarm
Forgewight
Duncan

Counters
- Interrupts
- Spirits of Disenchantment
Notes
- 3 Essences of Celerity are used for the sub dungeons and a full Conset is recommended for the Duncan in HM.
- i.e. Drop 1.5k when you enter the first sub dungeon for the BU user, and drop 1k when you enter Duncan's level.
External links
http://www.guildwarsguru.com/forum/current-dungeon-guides-t10450293.html