| NOTE: This template should be replaced with {{Real-Vetting}} |
|
This build is provisionally vetted Great pending more votes. Through the PvX vetting system, it has reached an overall Rating in the range from 4.75 to 5.0. The provisional rating is Great. If you have experience with this build, please rate it. This build has been designed for the following use: |
| This build requires Consumables to operate properly. |
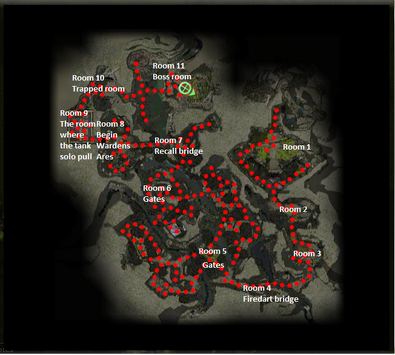
Speed Clear for Urgoz's Warren Elite Area. Using Warriors as main damage, to quickly kill Urgoz and get the Chest, a Mystical Summoning Stone, Chance on a Extreme Rare Old School Weapon and a decent amount of faction points. Teams are usually formed at Urgoz's Warren in the American district, which you can reach when using a Passage Scroll From House zu Heltzer, Or if you don't have that outpost yet, use it from Embark Beach. At least 1 of your Characters on your account must have finished the Factions Campaign, to be able to join the team in Hard Mode.
Overview
- 1x
 / AP Tank
- 1x/ AMo/Bonder
- 1x/ Seeder
- 6x/ WA 100B
- 1x/ Para
- 1x/ MoP
- 1x/ Splinter rit

Notes For the Whole Team
- Keep up with the rest of team in 1 aggro bubble at the tail of the A/P tank, but do not run in front the tank, or you will aggro/pop wolves too quick and cause body block for the rest of the team.
- A Birthday Cupcake is an obligation. When it happens that 1 of the gates close in front of you, while wolves just pop up. You need the extra movement speed so the wolves almost instantly stop follow you and turn back to their spawn-point. Just keep moving away from them until the gate open again, and proceed with the run.
- Use "I Am Unstoppable!" VS Knocked-Down and the Crippling effect. Use it on recharge, specially at the start of the run.
- Use Ebon Escape and Return to the A/P Tank as much as possible to keep up. But you have to be smart about it, so both skills are not on recharge at moments you really need it. Some parts you must use it, to jump pass a group Hopping Vampire or wolves that pop up. or make it in time, pass a gate that is about to close.
- Use Echo or Arcane Echo to copie your Ebon Escape specially at the fire dart bridge. Everyone must use Ebon Escape or the combo with Return, so your not get stuck at that part. You won't see that you are stuck and will be too late to notice. So use your step skills no matter what (total 4x at the bridge)
- Keep in mind that Ebon Escape heals other people.
- By the wardens room 8, the tank will ball up the Burning Brush and Brooding Thorns at the Guardian Serpent. When they are balled up the warriors kill them.
- After the Guardian Serpent is killed, the door will open to room 9. The tank will go SOLO in to that room, to pull the wardens away. That way the team can get a safe passage. The rest of the team has to pay attention to not steal aggro from the tank. If you do so, it is most likely the end of the run.
- In the meanwhile the tank is pulling the Wardens away, the team stay up that stair and enjoy the seed healing, which keeps the team alive very easy. If the team gets attacked by another group of the Burning Brush, Brooding Thorns, just kill them. Don't be an idiot and run in some sort rush/panic mode in to Wardens room 9, and steal aggro from the tank. Pay attention to your compass and don't steal aggro from the tank here!!
Video
AP (Tank)


Equipment
- Armor:
- Weapons:
- sword, axe or spear Of Enchanting + "I have the power!"
- Shield Of Devotion + "Trough thick and thin!" or "The Riddle of Steel" or VS plants
- Insightful staff Of Enchanting + "Have Faith" (for high energy, or if you want the Wolves to attack you insteade they go after the rest of the team)
- Zealous daggers Of Enchanting + "I have the power!" (for energy gain and help damage)
Usage
- The purpose of the A/P Tank: To lead the team through Urgoz. Use vipers to jump up and down bridges and tank away the Wardens and the Wolves. With this tactics, the rest of the team can run pass, and only kill the foes that have to be killed to be abble to proseed the run.
- PCons:
- Alcohol
- Birthday Cupcake
- Candy Apple
- Candy Corn (optional)
- Golden Egg (optional)
- Lunar Fortune (optional)
- Pumpkin Pie
- War Supplies
AMo (Bonder)


Equipment
- Armor:
- Weapons:
- sword, axe or spear Of Enchanting + "I have the power!"
- Shield Of Devotion + "Trough thick and thin!" or "The Riddle of Steel" or VS plants
- Insightful staff Of Enchanting + "Have Faith" (for high energy)
- Zealous daggers Of Enchanting + "I have the power!" (for energy gain and help damage)
Usage
- Don't run with a staff, but use your shield melee weapon set. If you run with a Staff the Wolves will hex you with Shroud of Silence and you won't be able to keep up with Ebon Escape.
- Don't ever run in front of the tank
- Put Life Bond on the Tank as soon as possible. So that the Seeder can Seed you, to provide a party wide healing as soon the tank or you/Bonder receive damage.
- Use Death's Charge to jump fast to the Guardian Serpents, to put up Ebon Battle Standard of Honor. Than the 100b Warriors can Ebon Escape to you and spike in a Ebon Battle Standard of Honor ward
- When you arrive at room 8 (the Wardens Area), you need to maintain your Shadow Form to prevent that your Life Bond or Seed of Life not get removed. Room 8, 9 and 10 are the main reason why you have Shadow Form in your build.
- Stay in compass range with the tank, without stealing his aggro. So the tank not get Recall out wile he is tanking and or lose his Bond which provide strong Seed healing for the team.
Variants
 Recall instead of
  Shroud of Distress .
- Recall when you have a full team. This is to prevent popping 200 foes at room 7 after the whole team cross that bridge. 1 person with Recall has to stay back to prevent this from happening.
Mo/Me (Seeder)
12 + 1 + 3 12 + 1 + 1 Your allies are healed for 51 Health whenever you cast Monk spells on them.  Template code |


Equipment
- Armor:
- 1x Superiour Divine Favor on Extra Headpiece for a strong Seed of Life
- 1x Minor Healing Prayer on Extra Headpiece which you use wile your running or when your HP gets low
- 1x Minor Divine Favor
- 1x Rune of Superior Vigor
- 2x Rune of Vitae
- 2x Survivor Insignia
- 3x Radiant Insignia
- Weapons:
- sword, axe or spear Enchanting + "I have the power!"
- Shield Devotion + "Trough thick and thin!" or "The Riddle of Steel" or VS plants
- Insightful staff Of Enchanting + "Have Faith" (for high energy)
- 40/40 Divine Favor set.
Usage
- Don't run with a staff, but use your shield melee weapon set. If you run with a Staff the Wolves will hex you with Shroud of Silence and you won't be able to keep up with Ebon Escape.
- Keep up Blessed Aura so your Seed of Life is extended.
- Keep up Unyielding Aura so if someone dies on his way, you can fast resurrect/teleport this person to you.
- Use Seed of Life on the Bonder to provide a Part-wide healing. If the tank or bonder not get any damage, you can pick any team member to use Seed of Life if it is needed to heal the person or the team.
- Use Heal Party if the team needs healing and your Seed is still on Rercharge.
- Use Essence Bond on the tank, so you don't get any energy isues wile spam Heal Party or Seed of Life
- If there are 2 monks in the team, time your Seed of Life for the moments you don't see the blue numbers in your screen from the other monks Seed of Life.
Variants
If you have 2 monks, Might as well have the 2 monks bring some damage. However, Keep in mind, that this is 1 of hardest job. So both monks have to know what they are doing. <pvxbig>
12 + 1 + 3 Your allies are healed for 51 Health whenever you cast Monk spells on them. Template code |


Video
Warrior (100B)
Your attack skills gain 11% armor penetration. Template code |


- Armor:
- 1x Superiour Swordmanship on Extra Headpiece for extra damage 100B
- 1x Minor Tactics on Extra Headpiece which you use wile your running or when your HP gets low
- 1x Minor Strength
- 1x Superiour Swordmanship
- 1x Rune of Superior Absorbtion
- 2x Rune of Vitae
- 5x Knight's Insignia
- Weapons:
- Sword Vampiric or Furious + pruning VS plants + "Strength and Honor!"
- Shield Fortitude + "Trough thick and thin!" or "The Riddle of Steel" or VS plants
- Insightful staff Of Enchanting + "Have Faith" (for high energy)
- Zealous Sword for energy gain
Usage
- Don't run with a staff, but use your shield melee weapon set. If you run with a Staff the Wolves will hex you with Shroud of Silence and you won't be able to keep up with Ebon Escape.
- Don't ever run in front of the tank.
- Kill the Burning Brush, Brooding Thorns that the tank has balled on the Guardian Serpent in room 8. In de meanwhile the tank pulls the wardens in room 9, kill the left over Burning Brush, Brooding Thorns. Or if the team has aggro from the other group, just kill them.
- Use a Zealous Sword for energy gain at Urgoz. so you can keep up "I Am Unstoppable!".
- At Urgoz, you have to ball up with the other warriors on Urgoz his feet. This is so the Explosive Growth pop up, al at the same point and can be killed with Mark of Pain and splinter weapon. If the warriors not ball up, it is possible the Explosive Growth are not in reach for enough damage to get killed. But they will hurt you, when they explode.
Variants
- "I Am the Strongest!" instead of Whirlwind Attack . On a couple warriors to speed up the killing of solo targets like the Guardian Serpent's.
Video
Para (Shouter)
12 + 1 + 3 12 + 1 You gain 2 Energy for each ally affected by one of your Shouts or Chants (maximum 6 Energy). Template code |


Equipment
- Armor:
- 5x Blessed Insignia
- 1x Superiour command on your headpiece
- 1x Minor leadership
- 1x Rune of Superior Vigor
- 3x Rune of Vitae
- Weapons:
- Spear Shelter + "I have the power!"
- Shield Fortitude + "Trough thick and thin!" or "The Riddle of Steel" or VS plants
- Insightful staff Of Enchanting + "Have Faith" (for high energy)
- Zealous Spear for energy gain
Usage
- Don't run with a staff, but use your shield melee weapon set. If you run with a Staff the Wolves will hex you with Shroud of Silence and you won't be able to keep up with Ebon Escape.
- Don't ever run in front of the tank.
Necroe (MoP)
Gain 4 Energy whenever a non-Spirit creature near you dies, up to 3 times every 15 seconds. Template code |


Equipment
- Armor:
- 1x Superiour Curses on Extra Headpiece for a strong spike
- 1x Minor soul reaping on Extra Headpiece which you use wile your running or when your HP gets low
- 1x Minor soul reaping
- 1x Minor blood magic
- 1x Rune of Superior Vigor
- 1x Rune of Vitae
- 2x Survivor Insignia
- 3x Radiant Insignia
- Weapons:
- sword, axe or spear Enchanting + "I have the power!"
- Shield Devotion + "Trough thick and thin!" or "The Riddle of Steel" or VS plants
- Insightful staff Enchanting + "Have Faith" (for high energy)
- 40/40 Curses set.
Usage
- Don't run with a staff, but use your shield melee weapon set. If you run with a Staff the Wolves will hex you with Shroud of Silence and you won't be able to keep up with Ebon Escape.
- Use Barbs And Dark Fury on the Guardian Serpents.
- In room 10 (the Greater Blood Drinker/trapped room) use Ebon Battle Standard of Honor on the next pop-up Greater Blood Drinkers as soon the first group is killed. Try to line this up with the A/Mo bonder so there is always a Ebon Battle Standard of Honor ward for the warriors to spike in.
- Use Mark of Pain on groups and Barbs on the "off damage" single targets. Use Dark Fury and Order of Pain whenever you can. However, be aware that This enchants can trick Strip Enchantment from the Greater Blood Drinker and hurt your team members.
- Copie your Mark of Pain to kill the last guardian Serpent at the entrance to Urgoz. This way you help with killing the Burning Brush, Brooding Thorns and Uprooted Malice. This is needed so the warriors not get killed at Urgoz.
- On Urgoz the most important skill you use is Mark of Pain. If you don't use it, the Warriors will die because of the Explosive Growth. Which will explode in <6 seconds after they spawned. So the combo 100B Mark of Pain and Splinter Weapon must have killed them, before they explode. This way the Warriors survive.
- After Mark of Pain use Barbs, Dark Fury and Order of Pain. Urgoz should die in <10 seconds.
Video
Necromancer PoV, Urgoz Boss Fight
Rt/Me (Splinter Weapon)
12 + 1 + 3 12 + 1 Creatures you create have 52% more Health, and weapon spells you cast last 52% longer. Template code |


Equipment
- Armor:
- 1x Superiour Channeling on Extra Headpiece for a strong spike
- 1x Minor spawning power on Extra Headpiece which you use wile your running or when your HP gets low
- 1x Minor spawning power
- 1x Rune of Superior Vigor
- 2x Rune of Vitae
- 2x Survivor Insignia
- 3x Radiant Insignia
- Weapons:
- sword, axe or spear Enchanting + "I have the power!"
- Shield Devotion + "Trough thick and thin!" or "The Riddle of Steel" or VS plants1
- Insightful staff Enchanting + "Have Faith" (for high energy)
- 40/40 Channeling set.
Usage
- Don't run with a staff, but use your shield melee weapon set. If you run with a Staff the Wolves will hex you with Shroud of Silence and you won't be able to keep up with Ebon Escape.
- Use Great Dwarf Weapon on the warriors when they are about to spike a single target.
- Use Splinter Weapon on the warriors when they are about to spike groups.
- Use spirits as a bait for Hopping Vampire and wolves.
- While you are in room 10, place your spirits on a smart spot, so they can strike most of the bloodrinkers that need to be killed, so the door will open.
- When you are the Urgoz Boss room 11, make sure that Splinter Weapon is on the warriors. Even though Urgoz is a single target, the warriors need Splinter Weapon to kill the Explosive Growth.
Variants
- Signet of Spirits instead of Echo .
- Arcane Echo instead of Essence Strike .
Me/Rt (Splinter Weapon Mesmer)
You activate Spells and Signets 17% faster. (No effect for non-Mesmer skills with a cast time less than 2 seconds.) In PvE, the recharge time of your Mesmer Spells is reduced by 12%. Template code |

